

Contents
Introduction
RepRapPro Mendel 3 fitted with Duet electronics. These pages are the complete instructions for building, commissioning and using the RepRapPro Ltd version of RepRap Mendel 3. Like all RepRap machines, RepRapPro Mendel 3 is fully open-source. It is licenced under the GPL. All the design files and software are available from the RepRapPro Ltd Github repository.
These instructions document the assembly of a single material/colour “Mono” Mendel. The extra Tricolour instructions follow the Mono instructions.
It is recommended that Tricolour machines are initially assembled as Mono Mendels, before being extended to Tricolour machines after commissioning, and you have gained some experience using the Mono. You are building a complex machine – the skills required and the rate at which you learn mean that troubleshooting when you have built it all at once is much more challenging.
For the most part, the construction of the Tricolour is the same as for the Mono. At various points there are small tasks that you need to do for the Tricolour. These sections are highlighted in green on the relevant pages.
General notes
Give yourself plenty of space and ensure your work area is clean. Dust and dirt are a 3D printer’s worst enemy. All printed parts have been printed on various RepRap machines from suppliers within the RepRap community. Despite the fact that these machines are highly tuned RepRap 3D printers, some holes and features may need a little fettling to get the best performance from the RepRapPro Mendel 3. This is especially true for the Igus bushings used for the Z axis. There is a video how-to on fettling 3D printed parts here on Vimeo.
Before you start the build, please ensure you have all the components as listed on the packing list included in the kit. If anything is missing, please contact us via email: ![]()
We understand that people may want to change aspects of the machine’s design, and in fact we encourage this as it is one of the benefits of open source development. Before changing anything, please be aware that the RepRapPro Mendel has been designed to maximise the build volume relative to the the machine’s footprint, and as such many of its components fit closely to others. So consider your changes carefully before you try to implement them. And when you find improvements, please tell us so that we can include them in future kits, and so that existing owners can upgrade their own machines.
BEFORE YOU ATTEMPT TO ASSEMBLE ANY PART OF THE REPRAPPRO MENDEL 3D PRINTER, PLEASE READ THESE BUILD INSTRUCTIONS FULLY AND ENSURE YOU UNDERSTAND THEM. Although all parts are covered by warranty, this will be invalidated by your not following these build instructions.
The RepRapPro Mendel is a robust RepRap machine once assembled; however it does require a certain amount of care during assembly. If in doubt, force is usually not the answer! There are many ways to get support and advice, see the Get Support section below.
Printing parts for Mendel 3
If you have bought the hardware-only version of the Mendel 3 kit, you will want to print the parts. You may also want to print spare parts for your printer. The list below shows the part number, part name, quantity and location of the parts. Most parts are available as STL or SolidWorks files, in the Mendel 3 github repository. Some parts common to all our machines are in the Library github repository. The extruder drive is in the Extruder drive github repository.
You can download all three github repositories, or download the parts individually; the ‘Location’ in the link below links to the stl page. This will also help you identify the parts. If you download the parts individually, make sure you download the ‘RAW’ version of the file; if you right-click on a link and download, you will end up with a file with the right name (with .stl on the end), but it will actually be an html document!
|
Get support
If you find you need help or advice with assembling, commissioning or using your RepRapPro Mendel 3d printer, you can use the following channels:
- Check the troubleshooting pages for common issues like connection, extrusion, sticking and printing problems.
- The reprap.org Mendel Forum. There’s also lots of experienced people (particularly with the Duet electronics) on the Ormerod forum.
- RepRapPro channel on freenode irc
- Email

Tool List
Mechanical
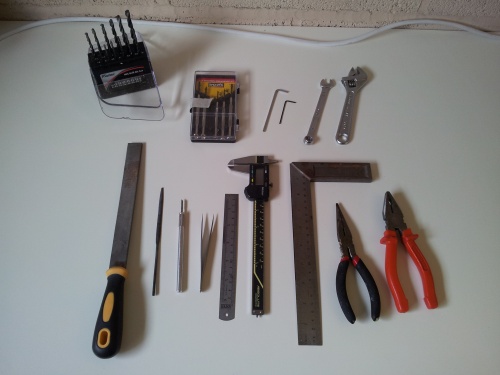
Tools required for the mechanical build of the RepRapPro Mendel 3D printer:
- Drill bits including 2mm, 3mm, 6mm and 8mm
- Precision screwdriver set
- A set of metric allen keys including:2mm (M2.5 size)
- 2.5mm (M3 size)
- 4mm (M5 size)
- 13mm spanner (M8 nut)
- 8mm spanner (M5 nut)
- 5.5mm spanner (M3 nut)
- 5mm spanner (M2.5 nut)
- 15cm adjustable spanner
- Half round needle file
- Craft knife
- Fine tweezers
- 300mm rule
- Vernier or digital calipers
- Square
- Fine nosed pliers
- Pliers
- Side cutters
- A small amount of superglue (for securing the hobbed insert)
Electrical
Tools required for the electrical build of the RepRapPro Mendel 3D printer:
- Digital Multimeter
- Precision screwdrivers
- Hair dryer (or other heat source for heating heatshrink wire sleeving; the barrel of a soldering iron works OK)
- Scissors