
Connect via the original (Firmware pre Version 0.65e) web interface
If you are using firmware with a version number before 0.65e you should upgrade it – instructions are here.
If, after reading that sentence, you are still using firmware with a version number before 0.65e then read on…
To use the web interface, you need to connect an ethernet cable from the Duet to your ethernet hub, switch or router. The Duet will need to be powered, either by USB or the ATX PSU – it cannot be powered by the Ethernet cable.
It is also possible to connect the Duet directly to your PC via Ethernet, but you will need to set up the ethernet port of your PC to match the Duet (or the Duet to the ethernet port of your PC). You PC will still need to have access to the internet (via another ethernet port or wifi) for the RepRapPro web interface to work.
You need three pieces of information to set up the Duet for your network; ip address, netmask, and gateway ip address. Often, small networks are setup using DHCP, which assigns ip addresses automatically to the devices that connect to the network. The Duet, at the moment, can’t use this; you need to set the ip address manually.
By default, the settings in sys/config.g on the SD card are:
IP address: 192.168.1.14
netmask: 255.255.255.0
gateway: 192.168.1.1
If you’re on a Windows PC, check that the settings you use on your network by opening a Command Prompt and sending ‘ipconfig’. This should respond with something that includes:
Wireless LAN adapter Wireless Network Connection:
Connection-specific DNS Suffix . : lan

Link-local IPv6 Address . . . . . : fe80::45dc:fdd3:67dd:db47%11
IPv4 Address. . . . . . . . . . . : 192.168.1.66
Subnet Mask . . . . . . . . . . . : 255.255.255.0
Default Gateway . . . . . . . . . : 192.168.1.254
On a Mac OS X, look at the ‘Network’ preferences panel to get the information. On Linux, look in the Network Manager, or in a terminal window type ‘ifconfig’.
This will show the settings you need to put in config.g for these two settings:
M553 P255.255.255.0; Set netmask (Subnet Mask)
M554 P192.168.1.254; Set the gateway (Default Gateway)
For the last setting, the ip address, choose a number that is 10 higher or lower than the address listed by ipconfig. In the example above, it lists 192.168.1.66, so set:
M552 P192.168.1.76; Set the IP address
If you need to edit these settings, edit the config.g file in RepRapFirmware/SD-Image/sys/ that you downloaded earlier. Then copy the new config.g onto the SD card.
Connect the ethernet cable to the Duet, and the hub/router/switch at the other end. The GREEN LED on the ethernet connector should light up, and flicker. The Orange LED is a indicator light for 10base-T connections – most ethernet hubs/routers/switches are 100base-T or gigabit, so it will stay switched off.
At the moment, only Google Chrome is supported. Other browsers will be added with later firmware releases. Download and install Google Chrome.
Run Google Chrome, and enter the ip address you set in config.g into the address bar; for example, 192.168.1.76 (from the example above)
If the web interface is correctly set up, you should be presented with a login screen. The default password is ‘reprap’; you can change this in the config.g file, too.
Using a Web Browser to Control your RepRap Firmware
At the moment the RepRap Firmware is configured to use the Google Chrome browser, which is available to download from that link. Other browsers will be supported soon.
Make sure that your network addresses in your Duet are set correctly – see the SD Files Section below.
Plug an RJ45 network cable into the socket on your Duet and plug the other end into your network hub or router.
Turn on the power to your RepRap. The green LED on the Duet’s network socket should come on, go out briefly, and then come on again, and may flicker. The orange LED may come on, or not, depending on the router it is attached to. Don’t worry about it if it doesn’t come on.
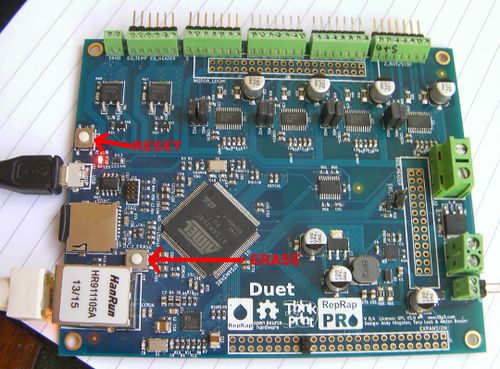
To double check, press the Duet’s RESET button. The LEDs should go through the sequence above. Don’t press the ERASE button by mistake. If you do, you will then have to re-flash the firmware (see below).
Give it a few moments to settle down.
Open the browser on your computer, and type the IP address (see SD Files below) of the Duet into its address bar. The following page will be displayed:

If the machine’s name is not displayed top left, then close the browser, press the RESET button, and try again.
The default password is “reprap” in lower case and without the quotes. Type that and click Submit. The page displayed will change to:

Click the Control link. You will now get:

The controls should be reasonably self-explanatory.
The STOP button is an emergency stop. It immediately stops all motors and turns off all heaters. After stopping the RepRap the only way to restart it is to press the Duet’s reset button. It will continue to talk to the USB and ethernet interfaces after stopping, but you won’t be able to move the machine automatically or turn on any heaters.
The Move box allows you to move the axes of the machine is small or large increments, and to home them to their zero positions.
The Motors Off button turns the motor currents off so you can move the RepRap by hand (especially useful for loading and unloading the extruder). There is no Motors On button – using a motor turns it on automatically.
The Current Position box displays where the RepRap is. These boxes are updated about once every two seconds. And the RepRap Firmware only updayes these values internally at the end of every move – they don’t track the progress of each individual move.
The Heaters box displays the RepRap’s temperatures (updated at the same time as the positions) and allows you to set them.
PLA printing temperatures: Extruder 200oC, Heatbed 60oC
ABS printing temperatures: Extruder 240oC, Heatbed 110oC (Don’t touch!)
To turn a heater off set its temperature to 0.
The 1mm, 5mm etc buttons after the Feed label extrude that input length of filament. If the extruder isn’t hot, don’t move the filament – it will be frozen in the nozzle and unable to move.
If you click on the Feed label it will cycle through Feed, Fast, and Reverse. Fast and Reverse are to allow you to load and unload filament quickly. Take care not to drive filament right into the RepRap’s nozzle at Fast speed. Rotate back to Feed when it has 30 or 40 mm to go.
In RepRaps with a controlled fan the Fan on button turns it on and off.
Finally, there is a panel that allows you to type any G, M or T code then send it to the RepRap. For a list of RepRap G Codes (not all of which are, or need to be, implemented in RepRap Firmware), see here.
Next click on the Print link in the menu bar. You will get this page:

Though the list of G Code files may be different.
To print a file on your RepRap, simply click on it. The print will start immediately. If you press Pause print the print will continue for a few moves (RepRap Firmware has an internal print buffer that has to be exhausted) then pause.
You cannot use the other controls to the machine while a print is running, as this would spoil the print. But if you pause the print, then move to the control page you will be able to use the controls after the second or so that it takes the temperatures and positions to update (whether the machine is paused or not is also sent with that update signal). Note that a side effect of this is that the web page does not know that a print is finished until you move back to the control page. This will be fixed in a future release.
To delete a file, select the Delete a file button then click on the file you wish to delete. The display will not update immediately; to force it to do so, go to the Control page then come back again.