
Contents
Goal
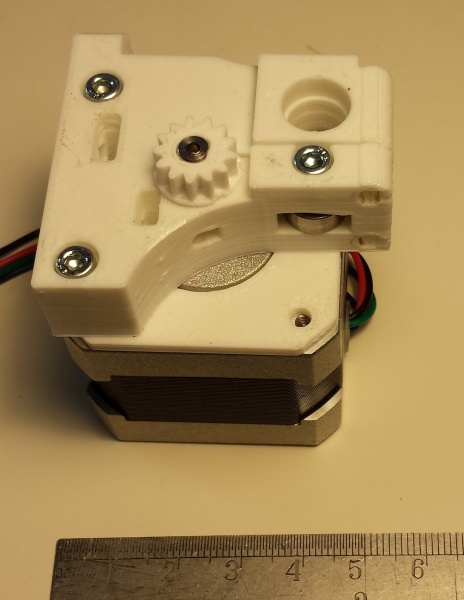
By the end of this stage your extruder drive will be mounted on the back of your Huxley like this:

Parts
For Huxley and Mono Mendel, you will build one extruder drive. For the Tricolour Mendel, you will build one for each colour/material that your Tricolour will print, up to a maximum of three. This section describes the parts for one drive.
|
 |
|||||||||||||||||||||||||||||||||||||
Assembly
Start by assembling the geared filament drive.
| NOTE: from 1st September 2014, we now supply a different hobbed insert (to standardise across all our printers), shown on the left, with an extra nut and washer. The original hobbed insert is on the right. |  |
|
| The nut and washer make it the same height and offset as the original version. |  |
|
| Take the M3x20mm hex screw, with the thread running all the way to the top, and insert it into the large drive gear. Put the 623 bearing on the screw, and then the hobbed insert. Make sure the flats of the hex head are aligned with the hexagon of the recess, then tighten the hobbed insert. The head of the hex screw should pull down into the hex trap, and be a nice tight, close fit. |  |
|
| If you have the old hobbed insert, you will notice that the hobbing is not in its centre. Put the insert on so that the hobbing is away from the gear end and the conical chamfer is against the bearing. After putting the bearing on, but before the hobbed insert, place a small blob of superglue or threadlock on the screw threads, about 5mm from the bearing. This will stop the hobbed insert unwinding while in use. Then screw on the hobbed insert. Do the hobbed insert up tight with your fingers. |  |
|
| For the new style hobbed insert, put the M3 nut on after the 623 bearing. Tighten the M3 nut, then put the M3 washer and hobbed insert on. Tighten the hobbed insert against the washer and nut. If you do this tight enough, you will not need superglue or threadlock, but be aware it may come undone. |  |
|
| Next put a 623 bearing in the back of the drive block as shown. You may need to clean the hole a little. Use a 10mm drill bit twisted carefully in the hole by hand. While you are at it, clean the hole at the other side too. |  |
|
Push the large gear and hobbed insert assembly that you just made into the opposite side of the block to the one that you just put the bearing into. Check that the hobbing is centred where the filament will run by looking in the unoccupied idler bearing hole in the side of the drive block (poke a length of filament down the 2mm hole in the top of the block if you can’t tell where this is).
Take the large gear and hobbed insert assembly out of the block for the moment.
Old version – motor with 19mm or 20mm motor shaft

If your motor looks like the above, use one 2mm thick motor spacer, between the motor and the printed extruder body, as below
Current version – motor with 22mm motor shaft

If your motor looks like the above, these motors have a longer motor shaft. Use two 2mm thick spacers, or one 4mm thick motor spacer, as below. If you only have 3 x 2mm motor spacers supplied in your kit, use two of them to build your first extruder. You can print 2 x 4mm motor spacers as you commission your printer! Or, contact reprappro support, and we’ll send you some more.

Assemble the drive
Mount the block on the motor using two 16mm M3 cap screws. Put the spacer between the block and the motor. The motor wires are at the back right in this picture.

Fit the idler bearing using the 12mm M3 cap screw as shown (the screw needs no nut to retain it).
Fit the small gear. You may find this easier if you use a sharp blade to put a slight chamfer on the underside of the gear where it meets the motor shaft.
Push the small gear onto the shaft such that its top is flush with the end of the shaft. You may need to tap it with a soft hammer or block of wood – take care, and support the back of the motor shaft as you do this, rather than the motor’s body.
Push the gear and hobbed insert assembly into its hole in the block. Rotate the gear as you do this so that it meshes with the small gear on the motor.
Note that the gear and hobbed insert assembly is designed so that the action of driving the filament tends to tighten the hobbed insert on the M3 thread. It can also be easily removed for cleaning when there is no filament in the drive. But when it is operating the filament that it is driving retains it in place by lying in the slight dent formed by the hobbing.
Fitting the drive
| Hardware | Quantity |
| M3x30mm screw | 2 |
| M3x20mm screw | 2 |
| M3 nut | 4 |
| M3 washer | 2 |
The two holes above the large gear hole act as the idler tensioners. Put a M3x30mm cap screw and washer into each hole, with a nut (no washer) in the groove on the other side. Leave this loose for the moment.
Tighten the nuts on both of these screws until they just touch the surface against which they bear, but no tighter. Later you can adjust these for idler tension on the filament.
Attach the drive to the bracket on the machine, using the two M3x20mm screws and M3 nuts as shown:

The above picture shows the tongue and Bowden extruder in place; this is done in the next step. The M3x20mm screw nearest the frame is easily accessible. For the further out mounting screw, there is a nut trap for the M3 nut, just in front of large gear in the picture above. The M3x20mm screw should be just long enough to engage with this.
You will have a few parts left over. The extruder is common to both the Mendel and Huxley, so it has the parts for the Mendel that are not used. These will be:
| Item – Not used on Huxley | Quantity |
| Frame Clip (printed) | 2 |
| Tabbed Frame Clip (printed) | 1 |
| M3 nuts | 2 |
| 35mm M3 caps | 2 |
| M3 washers | 6 |
The Tongue

You will be left with one small printed part left over; the tongue. This goes in the slot in the top of the extruder, below the large gear. It will hold the Bowden cable into the extruder drive, and is fitted in the next section of the instructions. Keep it safe for the moment.
Idler Tensioning
In order to tension the idler mechanism, tighten the two M3 cap screws and nuts mentioned earlier until the point that the drive block has sufficiently flexed that the two sides of the slot just touch at the top.
Feed a length of filament through the drive by turning the big gear by hand. When you hold the gear still, it should not be possible to pull the filament back out of the drive by hand. If it slips, tighten the two nuts slightly.