Contents
Materials
The material that we used to test the extruder was ceramic/clay. But the paste extruder should work with any paste with about the same consistency as toothpaste, including some foodstuffs like icing sugar (use it just after making it – it turns to syrup after a while), and materials such as this electrically conducting paste. These instructions are written for the clay powder that we supply with the extruder, so you may need to make adjustments and experiment if you use other materials.
The clay powder we supply is 250g of White Stoneware Powdered Clay with a firing temperature of 1210 to 1300oC.
You will need to mix the clay powder with tap water. The ratio we use is 100 ml of water with 180 g of clay powder. This is a compromise: the wetter the mixture the easier it will flow through the extruder and so the faster you can print with it, but the more the resulting print will shrink when it dries. Also if the clay is too wet it will not self-support in a three-dimensional structure.
Kitchen equipment is best for mixing. We mixed the clay and water in an old food blender. To do this put all the water you want to use in the blender, then add the clay powder a spoonful at a time. Spin the blender thoroughly after you have added each spoonful. We found that this produced a very smooth even texture that it was easy to remove from the blender using a silicone spatula.
It is essential to store the mixed clay in a sealed container to prevent it from drying out (also keep the powder in a dry place).
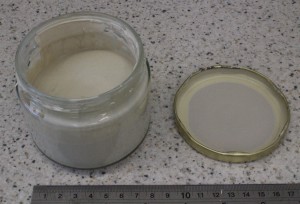
The best container is a short fat one, like the jam jar shown above. This is easy to load syringes from (see the video below). Wipe the rim of the jar, and the rubber seal in its lid, with a damp cloth before putting the lid on to ensure an airtight seal.
Settings
There is a folder Slic3r in the Github download that you acquired at the start of the build instructions. This contains the Slic3r settings for paste printing called Ormerod-clay.ini. Copy the files to the corresponding Slic3r settings folders on your system. You will notice that the filament diameter in the settings is set to the standard plastic filament size of 1.75mm (even though the syringe is about 10mm across). This is explained next.
Edit the config.g file in the sys folder of your Ormerod 2’s SD card to change and to add some G Codes.
Change the line that sets the steps per mm for the paste extruder motor to 70. Leave the settings for any plastic filament drives unchanged:
M92 E420:70:420:420:420
(This assumes that the paste extruder motor is plugged into Duet Shield stepper drive 1; set the correct one to 70 if you have plugged it into another drive: for example Duet drive 0, which is normally used for the plastic extruder.) At 70 steps per mm the paste extruder will output the right amount of paste when it is being driven as if it were a conventional plastic filament drive with 1.75mm diameter filament in it (see above). This means that the slicer program does not need to know anything special about pastes and syringes. You may need to experiment a little with the 70 figure to get the best results.
With a Shield add lines to define the paste extruder as Tool 1 (assuming your plastic filament extruder is set to be Tool 0; if you are using the Duet on its own you can just use Tool 0 for the paste extruder; don’t forget to set its temperature to -273):
M563 P1 D1
G10 P1 S-273 R-273 X19
Note that the temperatures are set to be absolute zero, which essentially means no heating. But the paste extruder is designed so that you can, optionally, add one of our standard heaters to it if you have some fancy paste that needs to be heated to elevated temperatures just before it is extruded. The X19 tool offset assumes that you have mounted the paste nozzle at the right end of the carriage facing the fan and that your conventional nozzle for plastic is on the left.
Put the SD card back in your Ormerod 2.
Make sure that the syringe drive block is roughly in the middle of its travel by turning the gears by hand. Turn your Ormerod on and connect to it with the web interface or Pronterface. Send the G Code:
T1
to select Tool 1. Then send:
M302 P1
This tells the firmware to allow cold extrudes. It will work without this (we defined low tool temperatures above), but this command also tells the web interface that you are doing cold extrudes so it won’t issue warnings to you. Now send:
G1 E200 F500
This should drive the block slowly forwards such that it would compress the syringe if there was one in the device. Now reverse:
G1 E-200 F2000
The block should move back to where it started.
Note that when the paste is loaded you want to be extruding at quite a slow speed. 2.5 mm/s (150 mm/minute) is a good value. The screw drive gives the stepper motor a big mechanical advantage so if you go too fast pressure will build up and you may damage something.You can retract as fast as you like.
Loading the syringe
The Paste Extrude kit contains three syringes. Two are for use in the machine and the third is for loading the first two. You will need a sharp blade to cut the conical end off the third syringe, but watch the video first.
This video shows how to load a syringe with paste.
As soon as a syringe is loaded put one of the little plastic caps provided on the end of the nozzle. Put a few drops of water in the cap first. This will stop the nozzle drying out.
Fit the loaded syringe into the drive
Take off the nozzle plastic cap and fix the nozzle into the cooling block of the hot end in the usual way. Tighten it so that it is a few mm higher than the plastic extrusion nozzle.
Put the cap back on, with a couple more drops of water in if needed. If you are not going to print paste and plastic together (this would be ambitious for your first print…) slacken the plastic nozzle and raise that higher too so that it is clear of the paste part that you are going to build as a test.
Switch on the Ormerod and connect to it with the web browser interface.
Send the G Code:
T1
to select Tool 1. Then allow cold extrudes:
M302 P1
We need to load the syringe into the drive without retracting the plunger (air bubbles) or depressing it (wasting the paste). What follows is how to do that.
Retract the extruder (repeated G1 E-100 F2000, or set a longer movement if you are confident you have space) so that the centre of the drive block is just forward of the end of the M3 threaded bar above it.
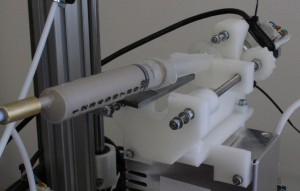
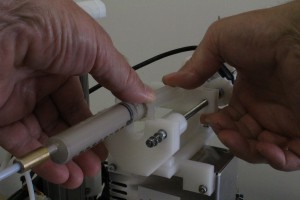
Carefully rotate the syringe plunger so that the webs on it are at 45o to the horizontal and vertical, then push the end of the plunger half way into the drive block as shown.
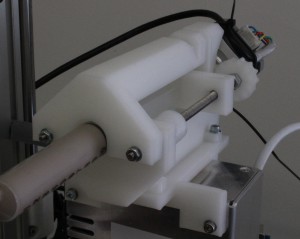
Place something flat between the syringe and its front mounting slot so the syringe can easily slide back and forth as a whole (the grey object in the picture above). Send G1 E commands to move the syringe until the projections on it just line up with the slot. Take the flat object away and press the syringe down fully at both ends:
Put the top strengthener back on as you practised previously:
Zero the axes (G28), then set the bed compensation (G32).
Take off the nozzle cap.
Send the machine to Z=0 in the middle of the bed:
G1 X100 Y100 Z0 F2000
Slacken the screw that retains the nozzle and let the nozzle drop so that it just touches the bed. Re-tighten the screw.
Test the paste extruder
It is useful to have a moistened Q-tip to clean the nozzle and to keep it damp.
Send the machine to a point where you can test the paste extruder:
G1 X190 Z20
Put a square of tissue under the nozzle to catch the paste. Clean and moisten the nozzle then extrude some paste:
G1 E100 F150
You may have to send this several times to get paste through and to clear any air bubbles. You should see a thin stream of paste that looks similar to the filament you get from the plastic extruder. Though the paste will probably not be so coherent if it is suspended in mid-air.
First Print
There is a folder in the download from Github called Test. This contains a G-Code file called simple-cup.g. Upload this to your Ormerod.
If you haven’t already, zero the axes (G28), then set the bed compensation (G32). Clean and moisten the nozzle.
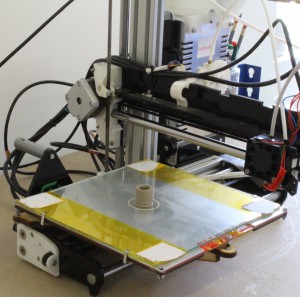
Run the simple-cup.g G-Code file. The result should look like this:
Cleaning
If you let any paste dry in the nozzle or elsewhere it will make your life difficult when you come to use the Paste Extruder again. So it is best to clean everything thoroughly after you have finished printing. If you really don’t have time to clean, at least put the nozzle cap back on the nozzle with a few drops of water in it.
Take the nozzle out of the cooling block and remove the syringe from the drive (take the top-strengthener off first). Separate the syringe from the nozzle/Bowden-tube assembly. Take the syringe apart and wash it thoroughly. Any specks of paste that remain to dry may detach on the next use and flow down in the new paste to block the nozzle.
Use a length of filament gently to push the paste in the tube out of the nozzle, then run water through the tube and nozzle (slowly, water can’t flow out of an 0.5mm hole fast) to clean it.
Removing prints from the bed
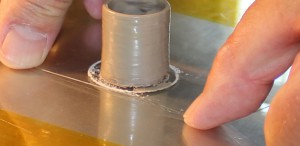
Slide a thin wire under the paste print to remove it while it is still damp. This is the same trick that potters use with a potter’s wheel. It does mean that you lose the bottom 0.5mm or so of your print though, so you may wish to allow for this in designs.
Alternatively, if you are not in a hurry, allow the paste to dry. You can then gently detach the print from the bed, though the adhesion will depend on the paste you use. With clay on glass or Kapton it works well.
Experiments and notes
Because you can use the Paste Extruder along with the conventional filament drive it should be possible to use clear natural PLA as a support material for the paste. If you do this with clay it should be possible to fire the result with the PLA in place – it should burn out cleanly in the kiln as long as you leave a gap for the gasses to escape.
If you have ever made anything on a potter’s wheel you will know that clay shrinks when it dries. The clay printed by the Paste Extruder is no different.
It would be interesting to experiment with solder paste in the Paste Extruder – this is something that we hope to try shortly. It should be possible to add a heater block to the extruder and to melt the solder paste as it exits the nozzle. However, we anticipate two problems with this potentially useful idea:
- Everything will block irreversibly when the nozzle cools, and
- the solder will slowly dissolve the stainless steel of the nozzle (all metals dissolve in molten metal to some extent).
There are many useful links on the RepRap Paste Extuder page.


