
Installation – Flashing the Firmware
Your Duet will have been supplied with a copy of the RepRap Firmware installed. But upgrades and enhancements will be made available regularly, and you will want to upload or flash these to your Duet.
IMPORTANT: note about USB 5V power
When using the Duet with 5V power supplied by the USB cable only (i.e. no power supply unit – PSU – power), you may find that the board doesn’t respond correctly. The web interface, SD card reading, IR sensor may all be unreliable. Three different voltages are used on the Duet: 12V for motors, fans and heaters, 5V is used to drive the MOSFET gates, and is converted to 3.3V for most other parts of the board (the ARM processor chip, thermistors, stepper drivers, proximity sensor, SD card, USB, and Ethernet).
It’s possible that your 5V USB power source (usually your computer) doesn’t supply enough current, to power the Duet, particularly if you’re working through a low quality USB power supply, an unpowered USB hub, or a laptop with low power USB ports. The Raspberry Pi, which uses a similar ARM chip, also has this problem. Plugging all the other connections in may also drain enough power to cause problems, particularly if there is a short circuit in your wiring.
Check the actual voltage of the 5V and 3.3V power lines. You can measure the 5V on Pin 1 of the expansion header, 3.3V on Pin 3 – these are the pins closest to the heated bed connection, just under the ‘SION’ of ‘EXPANSION’. Anything below 4.5V on the 5V line will make for a marginal 3.3V supply, and could cause a multitude of strange effects on the board.
CAUTION! Take care not to short 5V to 3.3V as you do this, i.e. don’t touch both pins at the same time! This will short 5V into the main ARM chip, most likely killing it!
The Duet will work correctly when 5V is supplied by the PSU, but don’t plug this in yet. If your USB power is not good enough, then routing the USB from your computer through a powered USB hub will usually work.
You can connect up your Duet before you even fit it in your RepRap. All you need is the SD card, a USB connection supplying a good current, and an ethernet connection. If you do this on the workbench take great care that nothing electrically conductive is near (or worse under) the Duet.
Check your firmware version
Connect to your Duet board via the Web interface. Your hub or router should allocate an IP address to your Duet when the Duet powers up if the ethernet cable is connected. By default the name of the Duet (and your Fisher) on your network is “fisher1” (without the quotes). Most hubs will allow you to access it using either “http://fisher1.local/”, “http://fisher1.home/” or just “http://fisher1/” (again without the quotes; the final “/” is usually required). If your hub does not recognise the name you can usually find the Duet by logging into your hub and listing its clients. Sometimes you have to type the IP address the hub allocates, which will be something like “http://192.168.1.100” (the final two digits may vary).
Select the G-Code Console tab.
Send the ‘M115’ G-Code. The response should be something like:
FIRMWARE_NAME: RepRapFirmware for Duet FIRMWARE_VERSION: 1.23 ELECTRONICS: Duet 0.6 FIRMWARE_DATE: 2018-12-24b1
Compare the firmware version information from the M115 command above, with the file name of the file in this link for Duet-0.6 or this link for Duet Maestro, which are on our github page. This file is the latest binary image of the RepRap Firmware for the Duet that we support. The name of the firmware reflects the version number, eg RepRapFirmware-XXX.bin, where XXX is the version, and may also include the date of the firmware.
If your firmware version is the same as the github version, there is no need to update. If not, read on…
Download the Fisher Files
| Go to the whole RepRap Ltd Fisher Github repository and download it. The button arrowed will download it as a .ZIP file. Alternatively, if you want to clone the repository (which makes it easier to keep your copy up to date) see the Git instructions here. The repository has all the files for the Fisher design, and is quite big – about 700MB. | 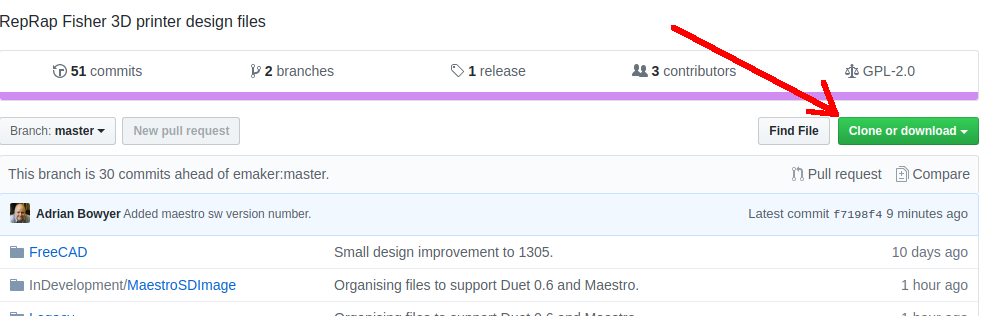 |
| The file you want depends on whether your Fisher has a Duet-0.6 or a Duet Maestro. The XXXs at the right are the version numbers. | Fisher/Software-Duet-0.6/RepRapFirmware-VXXX.bin
Fisher/Software-Duet-Maestro/DuetMaestroFirmware-VXXX.bin |
Ensure the right files are on your SD card
If you are upgrading, and you have G-Code files on your SD card that you want to keep, first put the SD card in your computer and copy the SD card gcodes folder onto your computer. Also make a copy of the config.g file in the SD card’s sys folder onto your computer.
| Your Duet is supplied with the microSD card pre-flashed with the default files. If this is not the case, please download the files as in the section above.
The images of all the files you need on your micro SD card depend on whether your Fisher has a Duet-0.6 or a Duet 2 Maestro. The locations of the files in the download are on the right. |
Fisher/Software-Duet-0.6/SD-Image
Fisher/Software-Duet-Maestro/SD-Image |
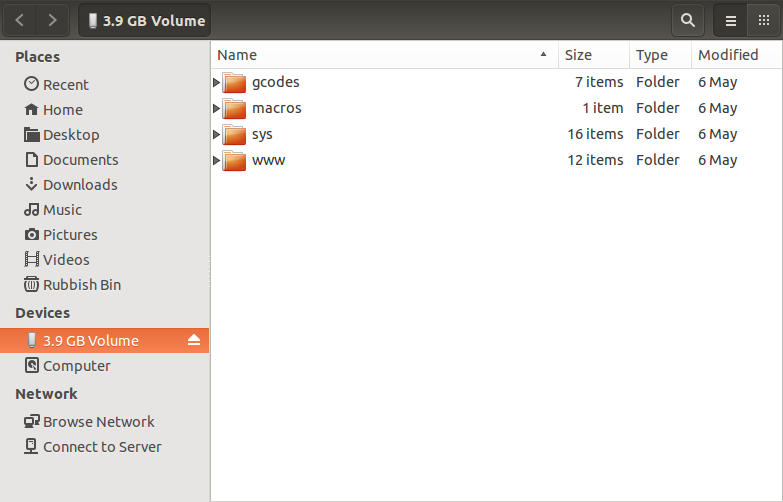
| The folder structure on your microSD card should look like the screenshot.
Copy the contents of the appropriate folder to the microSD card (i.e. don’t copy the folder called SD-Image; just copy what is in it). |
 |
Using the web interface to update the Duet
If the Duet firmware you have is recent (version 1.19 or later) then all you need to do is to upload the binary file from the previous section using the web interface and it will install itself.
If your Duet firmware is a version earlier than 1.19, then skip this section and go to Required Software below.
| Go to the Settings tab on the web interface then drag and drop the file you downloaded (RepRapFirmware-V1.23.bin or similar) onto the blue button under where it says “File Upload for /sys/ and /www/ Directories”. The file should upload and you will be asked if you want to install it. Say yes. | 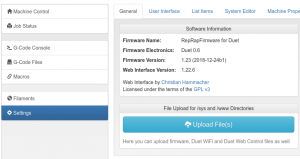 |
| Now power off the machine, take out the SD card, delete the WWW folder on it, and copy the WWW folder from the SD image you downloaded onto it. Put the SD card back in the machine. |
Required Software
If your firmware is older than version 1.19 this is the section you will need. If it is later the much simpler web interface update above should work.
You will need a copy of the Arduino IDE software. Download and install the latest version, appropriate for you PC, from Arduino. You MUST also install support for the ‘Arduino SAM Boards (32-bits ARM Cortex-M3) by Arduino’ (like the Due and Duet) by going to Tools > Board > Boards Manager.
To upload the firmware to the Duet, an application supplied with the Arduino IDE software called bossac is used. However, this is not installed as standard, but is downloaded and installed when you install support for the Arduino SAM-based boards (see above). So make sure you have installed support for the Arduino SAM-based boards.
Once installed, bossac‘s location will depend on your operating system:
| Windows – C:\Users\[username]\AppData\Local\Arduino15\packages\arduino\tools\bossac1.6.1\bossac.exe
AppData is a hidden folder, so to see this you will need to ‘show hidden files, folders and drives’ in the Windows Explorer > Tools > Folder options > Views > Advanced settings. |
| Linux – /home/[username]/.arduino15/packages/arduino/tools/bossac/1.6.1-arduino/bossac
.arduino15 is an invisible folder (because of the initial dot in the name), created in your user ‘home’ folder. Ctrl-h usually shows hidden files in Linux. |
| Mac – /Users/{username}/Library/Arduino15/packages/arduino/tools/bossac/1.6.1-arduino/bossac
The easiest way to get to it, as the Library folder in Users is usually hidden, is to click on the Finder ‘Go > Go to folder…’ menu option, then type ‘~/Library/’, then follow the above path. |
For all operating systems, for updating the firmware, it will be easier if you copy the bossac application, and the firmware .bin file, into the same easily accessible folder.
Updating the firmware
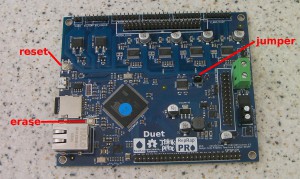
| Leave the power to your RepRap off, and connect the Duet to your computer with a USB cable. Make sure that the Arduino IDE Serial Monitor or Pronterface are NOT connected to the Duet board. Press the ERASE button on the Duet. Then press the RESET button. Wait a couple of seconds for the Duet board to start up.
|
 |
Windows
| Check that the Duet has been recognised by Windows, by looking in the Device Manager (how to). The Duet should be listed in the ‘Ports (COM & LPT)’ list, as ‘bossac programming device’ if the firmware has been erased. If it’s listed as an ‘Arduino Due’, the firmware has NOT been erased; see the above step. It should also have a COM port assigned. | 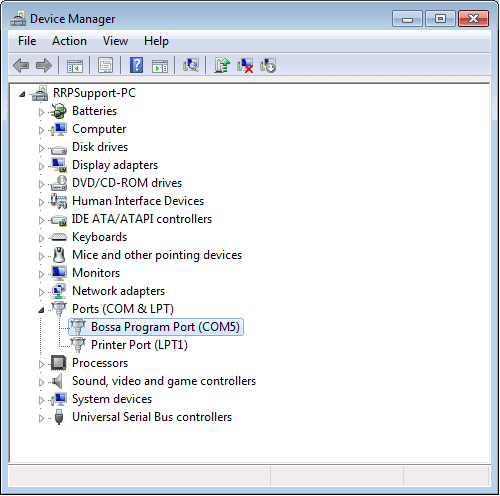 |
| It will be easier if you copy the bossac application (see the ‘Required software’ section above for bossac’s location), and the firmware .bin file, into an easily accessible folder. This example copies them both to a simple C:Temp folder. | 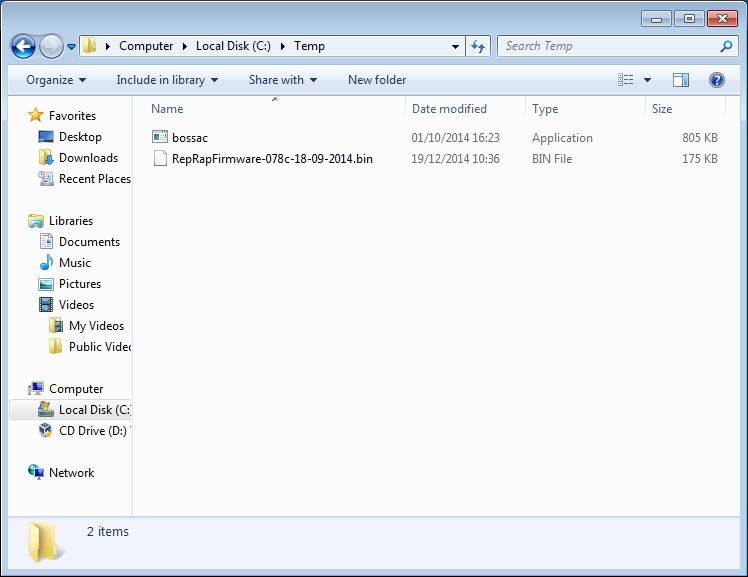 |
Open a Command prompt (how to), then type (without quotes) ‘cd C:Temp’ and press return to change directory (or change directory to wherever you put bossac and the firmware file). Type ‘dir’ and press return to get a directory listing; you should see bossac.exe and the firmware file. Type the following (change XXX to match the firmware name you want to upload):
bossac.exe -e -w -v -b RepRapFirmware-XXX.bin
And press return to send the command. Bossac will auto-sense the port the Duet is connected to, report the upload/flash progress then tell you that it has verified the process. |
Mac OS X
| Check that your Duet has been recognised by your Mac. Open the Arduino IDE, and see that it is in the list of ports; it will be something like cu.usbmodemfa131. You can also get this information by sending ‘ls /dev/cu.*’ in a Terminal window for a list of ports. | |
| It will be easier if you copy the bossac application (see the ‘Required software’ section above for bossac’s location), and the firmware .bin file, into an easily accessible folder, eg create a folder on your desktop called ‘flash’, and copy bossac and the firmware .bin file to this. | |
Open a Terminal window (how to), cd (change directory) to the folder where you put bossac and the RepRapFirmware-XXX.bin file. Then type the following (change XXX to match the firmware name you want to upload):
./bossac -e -w -v -b RepRapFirmware-XXX.bin Send the command. You should see bossac report the upload/flash progress then tell you that it has verified the process. |
Linux
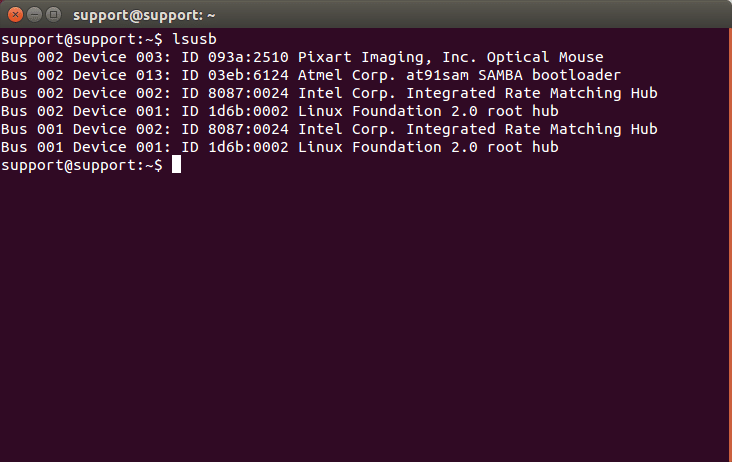
| Check that your Duet has been recognised by Linux. Open the Arduino IDE, and see that it is in the list of ports; e.g. /dev/ttyACM0.
You can also get this information by sending ‘lsusb’ in a Terminal window for a list of ports; if the firmware has been erased, the Duet should report as ‘Atmel Corp. at91sam SAMBA bootloader’. |
|
|
Open a terminal windows (xterm, gnome-terminal etc.) and cd (change directory) to the folder where you put bossac and the RepRapFirmware-XXX.bin file. Then type the following (change XXX to match the firmware name you want to upload):
./bossac -e -w -v -b RepRapFirmware-XXX.bin Send the command. You should see bossac report the upload/flash progress then tell you that it has verified the process. |
||
If it doesn’t work, check the error message. It may be you are running it from the wrong directory (eg ‘command not found’ or ‘no such file or directory’), or the firmware file name is wrong (‘no such file or directory’), or the command has been input incorrectly (‘bossac: invalid option’) or you haven’t waited quite long enough for the Duet to stabilise after pressing ‘erase’ and ‘reset’ (‘Auto scan for device failed’). Also, press ‘erase’ and ‘reset’ on the Duet again, and wait a little longer.
Tidying Up
Unplug the USB from your computer to the Duet.
Finally, if you backed up some G-Code files from your SD card at the start of these instructions, put them back on the SD card. Put the SD card into the Duet.
Now go to the Comissioning instructions to get your new firmware working.