
Resin filling FFF 3D prints: other people have done this before, but we have never had occasion to try this until now.
We had a heavy heat pump that was being installed in an old stable. Stable floors have a slight incline towards a drain to allow them to be easily cleaned, but the heat pump needed a level surface. So we decided to print some spacers to go under the feet and fill them with resin to make them strong enough to take the load.
Here’s the design:
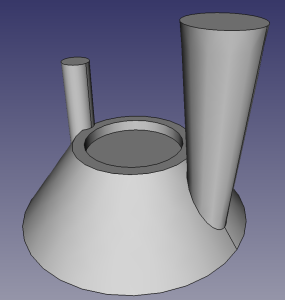
The cone with the cylindrical indentation is the actual thing we wanted. The big cone on the right is a riser and funnel to allow the resin to be poured into the interior of the print. The cylinder on the left is a vent to allow the air in the print to escape as it fills.
We printed the part with very sparse infill (2%, and the Slic3r infill pattern 3D Honeycomb) to allow the liquid resin to flow in the inside of the print. Because of the sparse infill we anticipated that flat upward-facing surfaces would not print well, and might not be watertight to keep the resin in, so we upped the number of top layers to 7 from our usual 4.
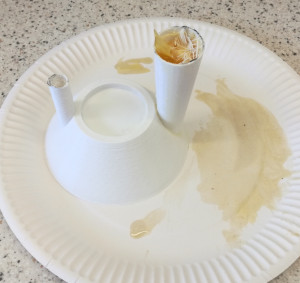
Here is the finished print ready to fill, with the two component resin measured out:

I say “finished”; we actually stopped the print 8 layers from the top to leave the riser open for pouring. We sawed the top off the vent and pushed a drill bit down it and the riser to disrupt the infill so that it was even less of an impediment to the flow of the resin. The resin we used was this one from Tomps. The paper plate was to catch leaks and spills.
We mixed then poured the resin until we saw it begin to flow up the vent. Here’s the result:
The resin polymerising is highly exothermic, and so it, and the RepRappped print, got almost too hot to touch. We printed it in PLA, and this softened a bit with the heat, but didn’t seem to distort very much at all.
The next stage was to fettle:
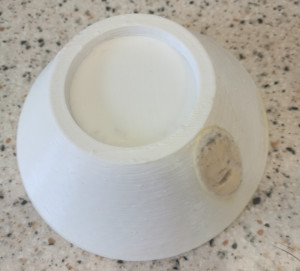
We sawed off the riser and vent, leaving the finished part. It’s not particularly pretty. But it is strong.
Finally we installed it under the two back feet of the heat pump. Here’s one:
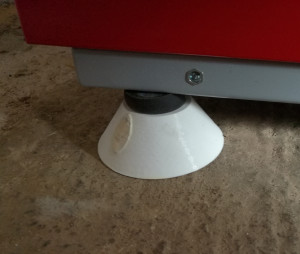
It seems to work fine, and there’s no sign of crushing, despite the 200 Kg weight of the heat pump.
Connect with us
Keep up to date on the latest RepRap Ltd news:
What’s the advantage over printing with 100% infill? Shouldn’t 100% infill be stable enough to support that weight?
Speed and cost, mainly. Plus it’s a lot stronger even than 100% infill.