
The other day I started a brief Twitter discussion by saying something that I thought to be true: “…SLA can’t do multiple materials in a single print.” But, as Bill Steele and Joel Telling pointed out, I was wrong. Also machinesynthesis sent me a link to this fascinating and clever (if a little complicated) multi-material SLA process. Chris Russell also pointed out this process, though as far as I can see that only does multi-material in horizontal layers. BillieRubenMake does something similar.
All this got me thinking about the easiest way to do multiple materials in a single SLA print. I came up with a method that is
- Simple, but
- Wasteful
I’ll solve the “wasteful” problem after I have described the simple version of the process for you.
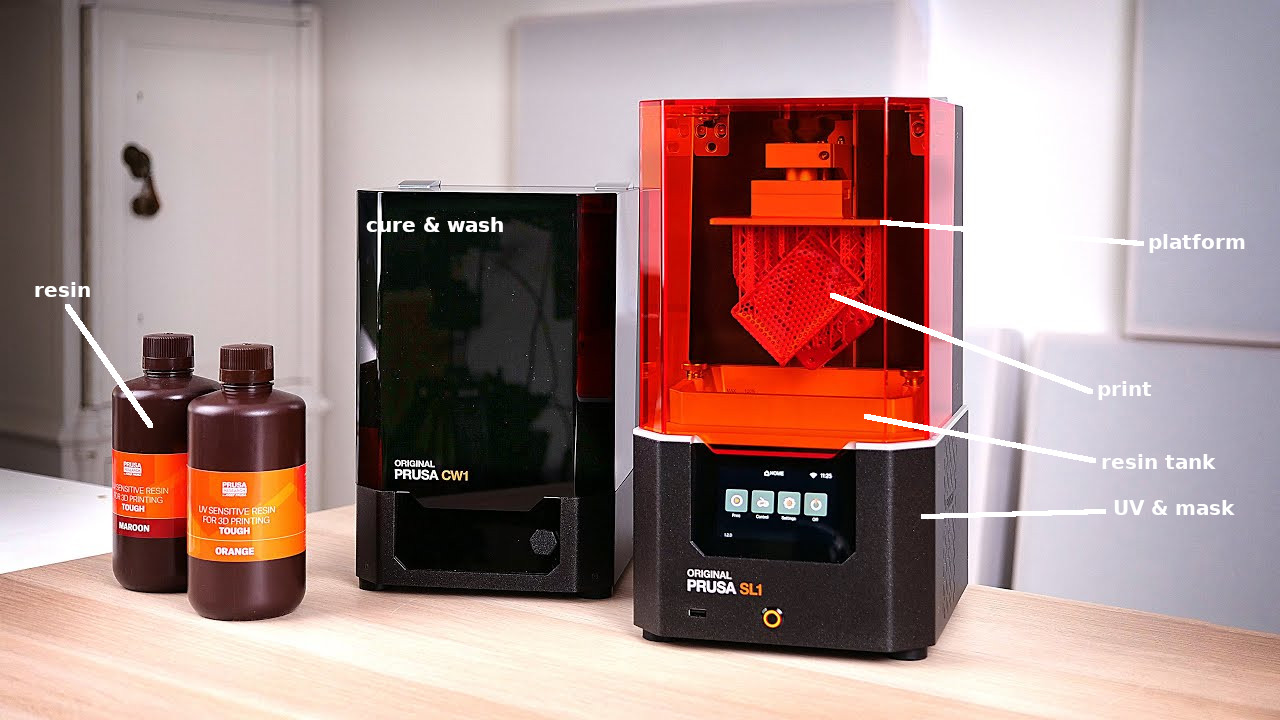 Photo credit – Thomas Sanladerer
Let’s start by briefly describing how conventional single-material SLA 3D printing works. The picture above is of Josef Prusa’s SL1 SLA printer, one of which he kindly gave to us. I took the picture from Thomas Sanladerer’s review of the machine here and added some labels. The printer is the machine on the right.
To make a print you pour photo-sensitive resin into the tank, which has a window in the bottom. Under the window is a UV light source behind an LCD mask. The mask can have any pattern of opaque and transparent areas written to it. The platform is lowered to a position a fraction of a millimetre above the window. The pattern of the first layer is written to the mask, exposing and solidifying the resin against the platform in that pattern. The tank is then tilted down slightly, peeling the print off the window. The platform is raised a tiny amount and the process is repeated to print the next layer. And so on.
The problem with making a multi-material print with this process is that you can only have one resin in the tank.
But suppose you printed the Layer-1 in Resin-A, then poured that away. You could then add Resin-B and print Layer-1 of Resin-B alongside Resin-A. You then move up, print Layer-2 in Resin-B, pour that away, add Resin-A and print Layer-2’s pattern of Resin-A, and so on.
If the whole process was conducted with the vertical axis of the machine canted at a small angle towards one corner of the window, that would facilitate the removal of the resins from that corner down a drain with a solenoid valve.
Now. As I have described that it wouldn’t work for two main reasons:
- Resin is sticky. Pouring it away wouldn’t remove all of it, so Resin-A and Resin-B would cross contaminate.
- Bubbles.
We can get rid of the cross contamination. This is the wasteful stage of my process: when replacing Resin A with Resin-B we use some of Resin-B to flush away the remains of Resin-A, discard the resulting contaminated Resin-B, then put pure Resin-B in. We do the same when replacing Resin-B with Resin-A.
That leaves the bubbles problem. In a conventional single-material SLA print the exposing-and-peeling process is always submerged in the resin tank, so bubbles can’t get in. But the flushing process I have described would allow air bubbles to be retained after the flush where the print touches the window, giving a very poor-quality print.
However, resins have a very low vapour pressure. This is what allows conventional vacuum resin casting to work. So the entire process I have described could be carried out in a vacuum chamber, which would eliminate the bubbles. The resins would have to be vacuum de-gassed before the start, but that’s just the same in vacuum resin casting too.
Finally, what about the waste? The picture shows the cure and wash machine for prints on the left. When a print is finished any uncured resin sticking to it is washed away using isopropyl alcohol by this machine, which then cures the print by exposing it to more UV light. We could use the same washing process to flush the resins as Resin-B replaces Resin-A and vice-versa, thus not wasting a load of resin.
But we couldn’t use isopropyl alcohol, because it has a vapour pressure of 33 hPa at 20 Celsius (about twice the VP of water), so it would just boil in the vacuum. We need an organic solvent with a very low VP – something like aniline (0.4 hPa at 20 Celsius), though I don’t know if that would wash resins well. We’d probably have to wipe any remaining solvent off the bottom of the print before the next resin was added, too – clearly the solvent won’t evaporate.
I can see no technical reasons why the process described here wouldn’t work. And it could obviously be extended to use any number of resins, not just two, allowing insulators and conductors, different filler materials, and different colours.
Finally, as soon as this blog post went live, Erin Rose had the idea of having two or more resin tanks containing different resins and moving each under the growing print in turn, after it has been flush cleaned. This would remove the need for a drain and refill. Brilliance, and the wonder of open-source!
– Adrian
Connect with us
Keep up to date on the latest RepRap Ltd news:
Just have multiple separate printers with different resins, then just mechanically move the printed part between them.
That doesn’t address the two problems numbered above, unfortunately.
Pingback:New Technique Enables Intermixing Materials in SLA 3D Printing – just-globaladditives
Going on either the 2 separate printers route or having 1 printer but 2 vats with a different resin in each. If you add third vat which has just IPA 70%, add a dip function to dip the part into the IPA vat to clean it and stop cross contamination?
You can use resin that needs a different UV wavelength for curing. If you are able to mix two resins with completely distinct properties with completely separate uv wavelengths for curing you probably can interpolate the resulting material properties by manipulating the wavelength of the light source.