Contents
Introduction
This page tells you how to set up the axis compensation of your Ormerod, so that it can print accurately. You should have covered basic communication in the ‘Commissioning’ section.
Ormerod supports both a USB interface, via the RepRap utility Pronterface, and a new ethernet/web interface the a web browser. At the moment only the Google Chrome web browser is supported. This restriction will be removed in future firmware releases.
Setting the Z Probe
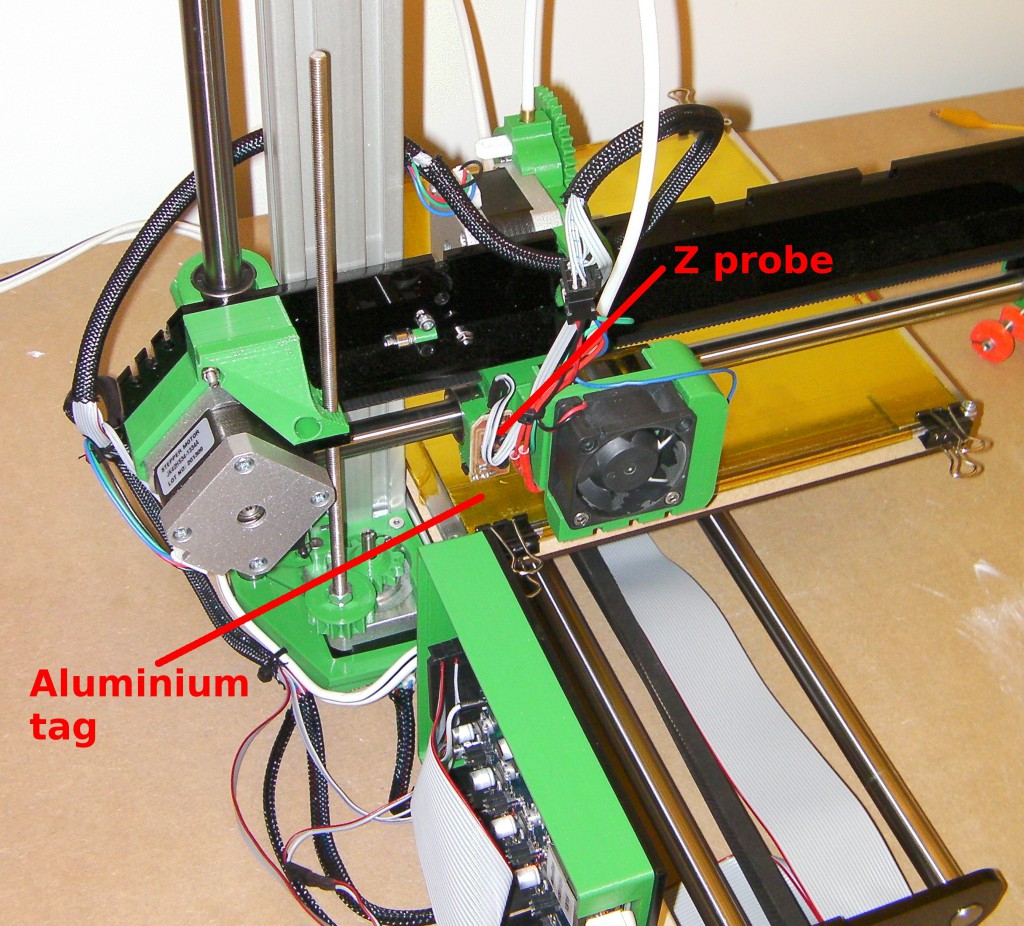
The proximity sensor (also known as the Z probe) uses an infra-red sensor to detect the aluminium foil tags that you put under the Kapton tape on the bed glass.
Plug both the USB and ethernet cables in and turn on the power.
Now a useful thing: you can use both interfaces at the same time – the RepRap Firmware in the Duet controller will sort everything out for you. Open the Arduino IDE and go to Tools->Port and select the USB port for your Ormerod. Then go to Tools->Serial Monitor. Make sure the speed is set to 115200 (bottom right) and that Newline is selected (next to the speed). Now type an M105 GCode command to your Ormerod in the Send bar and send it:
serial: M105
okT:16.3 B:18.9
Ormerod is saying it got a command on its serial (i.e. USB) interface, and is reporting its temperatures to you. You are talking directly to the USB interface, something that is normally mediated by Pronterface. You can actually do the whole of this section just by typing commands at this interface. but things will be quicker if you also use the network interface at the same time. Open a browser and log in. You will see the web requests reported in the USB window:
HTTP request: GET / HTTP/1.1
HTTP request: GET /rr_name HTTP/1.1
JSON response: {"myName":"Ormerod"} queued
This is either interesting or tiresome, depending on your point of view, but anyway it’s probably best to turn all this USB reporting off. Do that by sending M111 S0 (debug off; you can either use the Serial Monitor or the Send G Code box on the web Control page).
On the web control page lift the Ormerod’s Z axis by +10mm to make sure the nozzle is well clear of the bed, then select Home X and Home Y. Those two axes should zero themselves.
Now use the controls to move the Z probe over the aluminium tag in the bed corner. (X = 55, Y = 0) should be about right:
Send the command M558 P1. This activates the Z probe. This should already be in your config.g file, but make sure it loads on startup (see the section in the commissioning instructions).
Make sure the tag is well under the probe – you don’t want the probe near its edge.
Now move the Z axis down so that the nozzle is a tiny bit above the bed and you can just see light between the two. Take care – you don’t want to crash the nozzle into the bed. When you get near, move in 0.1mm increments.
Send a G92 Z0 command. You should see the Z position on the Control page go to 0.0. G92 tells the RepRap Firmware that an axis is at whatever position you specify. As the nozzle is almost touching the bed, we want this to be Z = 0.
Next send a G31 command. This fires the Z probe and reports the measurement it makes in the Serial Monitor window. The measurement should be about 950 or so.
(What’s going on? The Z probe works by reflected IR light. The closer it gets to the aluminium the more light is reflected, and this sends back a bigger voltage to the Duet controller, which converts the voltage into a number. The biggest possible voltage is 3.3 volts, which the Duet would convert to 1023 = 210 – 1. So the 950 means “pretty close”.)
Now. It is not a good idea to zero the Z axis by driving it down and looking for this value for two reasons: 1. the probe is not very accurate or sensitive at the very top end of its range, and 2. it gives us no room for error – we might crash the bed.
So, raise the Z axis in small increments and send a G31 after each movement. As you start, you will see almost no change (not very accurate or sensitive at the top of its range, remember?), but then the readings will start to drop. Stop when they are somewhere between 700 and 600. Suppose the value is 656. Look at the Z position box. Z will probably be between 1 and 2mm off the bed – say it’s 1.8mm.
Now send G31 Z1.8 P656
This use of G31 sets values, rather than reporting them to you. It tells the Duet that a reading of 656 corresponds to Z = 1.8 mm off the bed.
Now when you select Home Z, Z will drop until the Duet detects a probe reading of 656. It will then lower by a further 1.8mm, and you will be at Z = 0. Try it: raise Z to about 10mm, then select Home Z. Ormerod will home its Z axis.
This is all very well, but you don’t want to go through this rigmarole every time you turn on the machine. So put the G31 Z1.8 P656 (with your numbers, obviously) in the Ormerod’s config.g file. That will set these values every time you reset the machine. See here for how to edit the config.g file.
As mentioned above, the position X=55, Y=0 should be about right for the IR probe to be above the aluminium foil. But if your position is significantly different you will also want to record that permanently so that your RepRap always homes its Z axis in the right X,Y position. The axes are all homed by macros. These are little G Code files stored in the sys folder on the SD card, and are described here. There is one called homez.g. As supplied it looks like this (with comments for explanation):
M120 ; Push - save the current feedrate and relative/absolute move status
G91 ; set movements relative
G1 Z5 F200 ; move upwards 5mm at 200 mm/min to make sure we don't hit anything
G90 ; set movements absolute
G1 X55 Y0 ; Move to the X, Y point at which to probe the bed over the foil
G30 ; Move down until the probe is triggered (i.e. move down until the IR voltage is 656, which automatically sets Z = 1.8mm).
G1 Z0 F200 ; Move down to Z=0 (i.e. move down the last 1.8mm)
M121 ; Pop - restore the feedrate and relative/absolute move status
If your foil is in a different place, change the G1 X55 Y0 line to the appropriate X and Y coordinates.
Finally, as you would expect the IR probe will be affected by infra-red light. If this changes (such as the sun falling on your Ormerod at one time but not another) the probe readings will change.
Getting Extrusion Just Right
To get the best quality prints, you need to make fine adjustments to the filament feed to make it as accurate as possible.
Using Pronterface for this is best, as in a moment you’ll want to see what happens on the USB interface in its window.
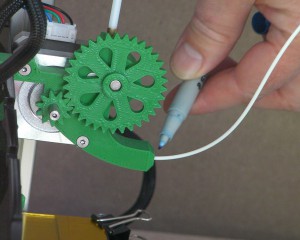
Select Motors Off, so that you can turn the extruder mechanism by hand. Feed filament into the input of the filament drive, and wind the big gear until the filament is just visible in the PTFE Bowden tube. (Don’t pinch your finger in the gears…) Then use a felt-tipped pen carefully to mark the filament just where it enters the mechanism.
Now tell Ormerod to feed 100mm of filament. Mark the filament again.
Reverse the filament by 110 mm, so you can see both marks. Using a ruler carefully measure between them. The measurement probably won’t be exactly 100mm. Suppose it is 97mm.
Now send an M92 command. The result in the USB interface window will be something like:
Steps/mm: X: 87, Y: 87, Z: 4000, E: 420
These numbers are the number of pulses sent to each stepper motor to drive it 1mm. Because you only got 97mm and you wanted 100mm, the E420 needs to change to 420x(100/97), which is to say 433. Do that calculation for the length you measured, then add a line saying
M92 E433
but with your number in place of the 433 to your config.g file. (M92 reports the values with no arguments; if you give it a value, it sets it.)
Now your Ormerod will extrude precisely the right amount of filament when it’s printing.
Finally, set the temperature of the hot end to 200oC. When it gets to temperature feed the filament all the way to the nozzle. You can run it fast when the end is still visible in the tube (800 mm/minute in Pronterface). But make sure you slow down before the filament enters the hot end, and extrude at 100mm/minute maximum. If you try and extrude too fast, there will not be sufficient time for the heater to melt the plastic, and the pressure required to extrude will increase until the extruder motor skips, or the hobbed insert slips on the filament, and extrusion stops.
Bed Plane Compensation
Ormerod has several ways to allow you to compensate for the fact that the plane of its printing surface may not be exactly at right-angles to its Z direction. This section tells you how to implement your choice among these.
1 – Bed Plane Compensation – setting by hand
This is quite simple and gives good results. It is most easily done using the web interface.
First make sure that your Ormerod has no compensation set already. Send it an M561 command. This will reset the bed plane transform to the identity transform, which is mathspeak for not doing any compensation.
Then send M556 S100 X0 Y0 Z0. This resets all orthogonal axis compensation to zero (see below). Don’t forget the S100, or nothing will change.
Now decide on a rectangle, at the four corners of which you are going to measure the Z height of the bed. You want this to be as big as reasonably possible without colliding with anything. Good values of X and Y might be X = 60 and 180, Y = 20 and 180. Let’s assume you are going to work with those.
Raise the nozzle to around 10mm above the bed, home the X and Y axes, then
move to X=60, Y=20. (You can either use the move buttons to move, or send the command G1 X60 Y20 to go there directly.)
Now lower the nozzle until it is almost touching the bed, but you can just see light under it. Send a G92 Z0 command to set this point as Z=0. Jot down Z = 0.
Send the command G30 P0. This records the current nozzle position as the first point for the bed compensation calculation.
Raise Z by two or three mm, and move to X = 60, Y = 180. Repeat the procedure, moving the nozzle to just above the bed then this time sending G30 P1. this sets the second bed point. Look at the Z coordinate value (if you’re doing this in Pronterface rather than the web interface, press ‘GET POS’ or send M114) and jot it down.
Lift the nozzle, go to X = 180, Y = 180, and repeat, this time sending G30 P2. Jot down the Z value.
Finally go to X = 180, Y = 20, lower the nozzle, and type G30 P3 S. This will record the position of the fourth and final point, and the ‘S’ tells the system to calculate the equation to do the bed compensation. Again, note the Z value.
To test what you have done, leave the nozzle just above the bed and run the G Code file CIRCLE.G, which should be on the SD card. This will lift the nozzle 5mm, then run the machine in a big circle. If you watch the nozzle it should remain level with the surface of the bed. You will see the Z axis drive screw rotating a small amount as the circle is described – this is the compensation in action.
When doing this procedure always put the points in in clockwise order round the rectangle, as above, starting with the point nearest the origin.
A useful M code when you are experimenting with bed plane compensation is M561. This removes the compensation and sets the machine’s idea of what the bed plane is like to what it was when it was powered on.
Bed Plane Compensation – recording hand settings
You can put the Z readings you jotted down in a file so you don’t have to do this every time the machine is run. Say the Z readings were 0.0, -0.3, 0.2, -0.5. Then use a text editor to create a file called setbed.g containing:
G30 P0 X60 Y20 Z0.0
G30 P1 X60 Y180 Z-0.3
G30 P2 X180 Y180 Z0.2
G30 P3 X180 Y20 Z-0.5 S
(Note that if you do anything that raises or lowers the bed, like changing its adjustment screws, you will have to re-do these numbers.)
Put setbed.g in the gcodes folder on your SD card. (It is best not to put the G30s in config.g. If you do that the machine won’t be in its standard state when it powers up.)
To set the bed compensation, just run setbed.g as if it were a file to print.
2 – Bed Plane Compensation – fully automatic
Fully automatic bed plane compensation is a very easy process, but it is a bit experimental at the moment. It uses the IR Z probe to probe the bed in four places automatically.
As before choose a rectangle of (X, Y) points at which to probe. Make sure that when the nozzle is at each point, there is piece of the sticky-backed aluminium foil under the Z probe between the Kapton tape and the glass. Good coordinates are X = 60, 220, and Y = 0, 180. But move your own machine around and check against the aluminium tape. You need the IR Z probe to be roughly over the middle of the tape.
Now record the points at which you want automatic probing to take place. You can either put these in a short G-code file that you run, or add them to config.g.
M557 P0 X60 Y0
M557 P1 X60 Y180
M557 P2 X220 Y180
M557 P3 X220 Y0
Make sure you set them in clockwise order round the rectangle, starting near the origin.
Set the Z Probe correctly (see the section above).
Now sending a G32 command will cause Ormerod to probe all four points and set the bed compensation automatically. Note that there is no problem with putting these commands in config.g. They will have no effect until you execute the G32.
3 – The old-fashioned way; by hand!
In an ideal world, you could build a machine that was perfectly square and needed no compensation. The Ormerod should be fairly square anyway, but getting the bed plane reasonably flat before doing either Bed Plane Compensation described above may improve the results.
To allow for more adjustment, you will need to replace the five M3x12mm cap head screws with longer, 20mm cap head screws (to allow for adjustment), and add 5 more M3 nuts. These are not supplied with the kit.
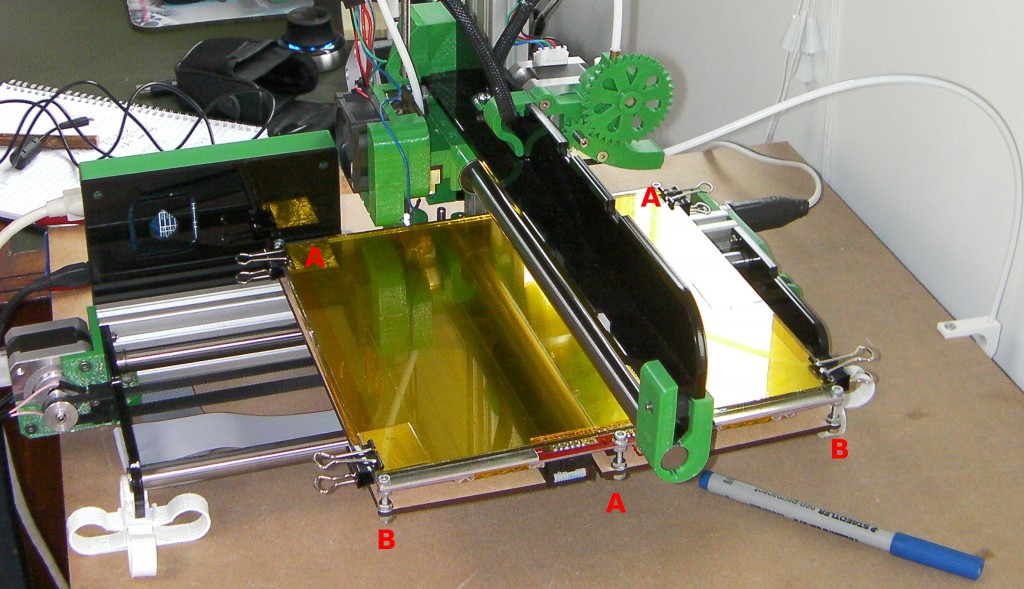
For this it is useful to have a drill bit of known diameter – say 3mm. You are not going to make any holes. But you can use the cylindrical drill shank as a 3mm reference. Home the X and Y axes, as described above. Then move over the aluminium tab nearest the origin and home Z. Now raise Z by 3mm. You should find that the drill shank will just roll under the nozzle.
The main adjusting screws are the three As in the picture.
Now slacken the nuts that hold the bed on the two corner screws furthest from all the mechanics of the machine – the corners on edge that sticks out (B). These corners do not supply a lot of supporting force to the bed, and so we want the screws there to move freely for the moment while we adjust the more important other three.
Move the Y axis to about Y = 190. Roll the drill under the nozzle. You will probably find that the bed is either too high or too low. Adjust the screw in that corner so that the drill just rolls under the nozzle. If you have to adjust too far, it may be better to go back and do some adjustment at the Y = 0 end. The important thing is not to achieve any particular height – it is to get both ends the same. Take care when making the adjustments that you don’t cause the ends of the screws to scrape on the aluminum extrusion beneath them.
Now move to X=190 Y = 100 and adjust the height over the screw in the middle of the far edge – the edge that sticks out.
Finally tighten the to corner nuts that you loosened at the beginning to whatever position their screws lie in.
The bed will now be much more accurately flat. Now run one of the Bed Plane Compensation options.
Orthogonal Axis Compensation
Before doing the compensation described in this section, first do the Bed Plane Compensation described above. Orthogonal Axis Compensation depends on having the bed plane right.
This compensation is not intended to avoid all the effort in getting the axes at right angles. Use a set-square on the bed to set the vertical Z pillar at right angles to the bed.
Now skip to the Printing Instructions. They tell you how to do your first print, which you will need to set the orthogonal axis compensation. Then come back and do the rest of this section….
Setting the compensation from the printed test parts
Ormerod allows you to compensate for the fact that its X, Y, and Z axes may not have been assembled at perfect right angles. This section tells you how to implement this.
First clean any extraneous wisps of filament or small lumps on the surface of the printed parts away. When you get used to printing these won’t happen anyway, but this was your first print, and so it would be unreasonable to expect it to be perfect.
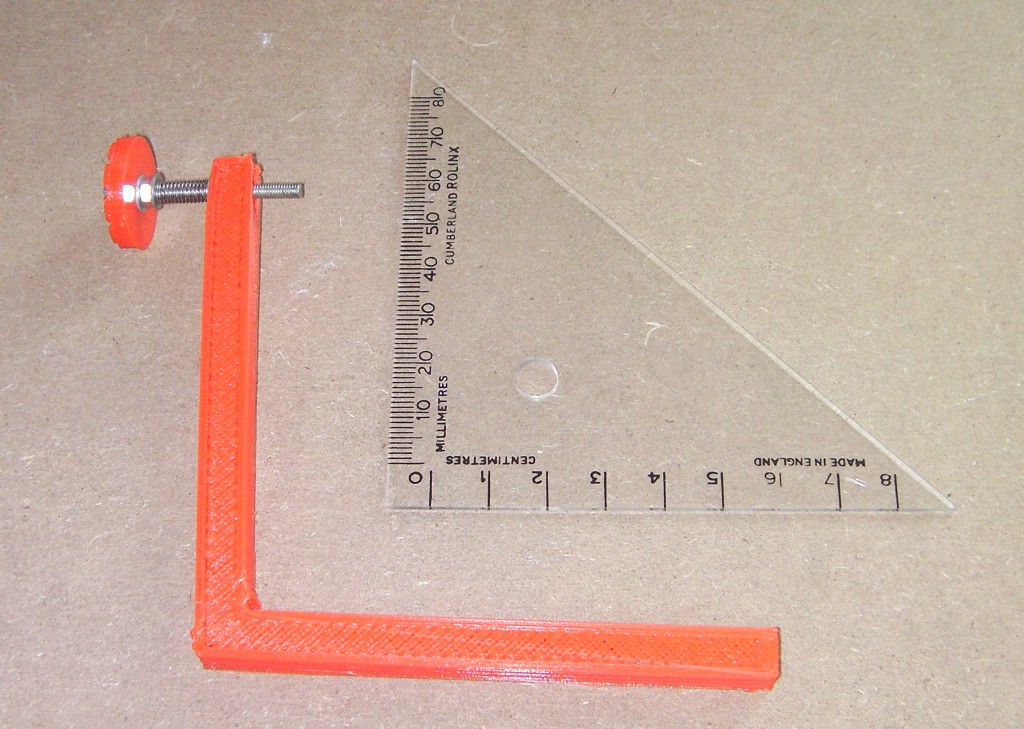
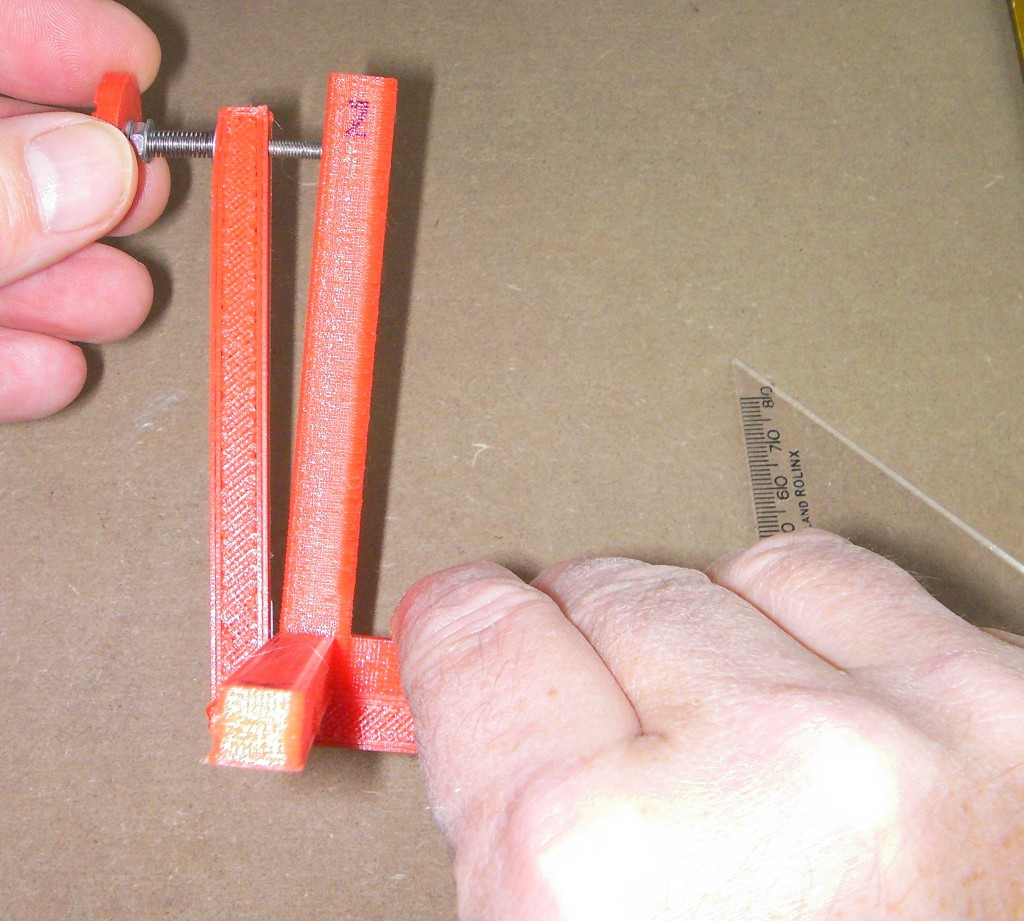
The thumbwheel in the test print has 10 radial indentations to allow you to count turns of it. Use a felt-tipped pen to mark one indentation so you can identify it as the wheel turns. Then assemble the gauge shown above.
Start by using a short M3 screw to draw an M3 nut into the hexagonal cavity in the angled part. Put an M3 washer under the head of the screw. Take care as you tighten the screw that the flats on the nut are aligned with the hexagon of the cavity. You will feel the tightening force increase as the nut reaches the bottom of the cavity.
Then assemble the measuring screw. A 35mm hex-headed screw fits in the cavity in the top of the thumbwheel. Secure it there with a nut with a washer under it on the other side of the wheel. Then put a washer, a spring, and another washer on the screw and screw it into the nut embedded in the cavity of the angled piece as shown above.
The order goes: hex-head 35mm M3 screw, thumbwheel, washer, nut, washer, spring, washer, angled piece, nut embedded in the angled piece.
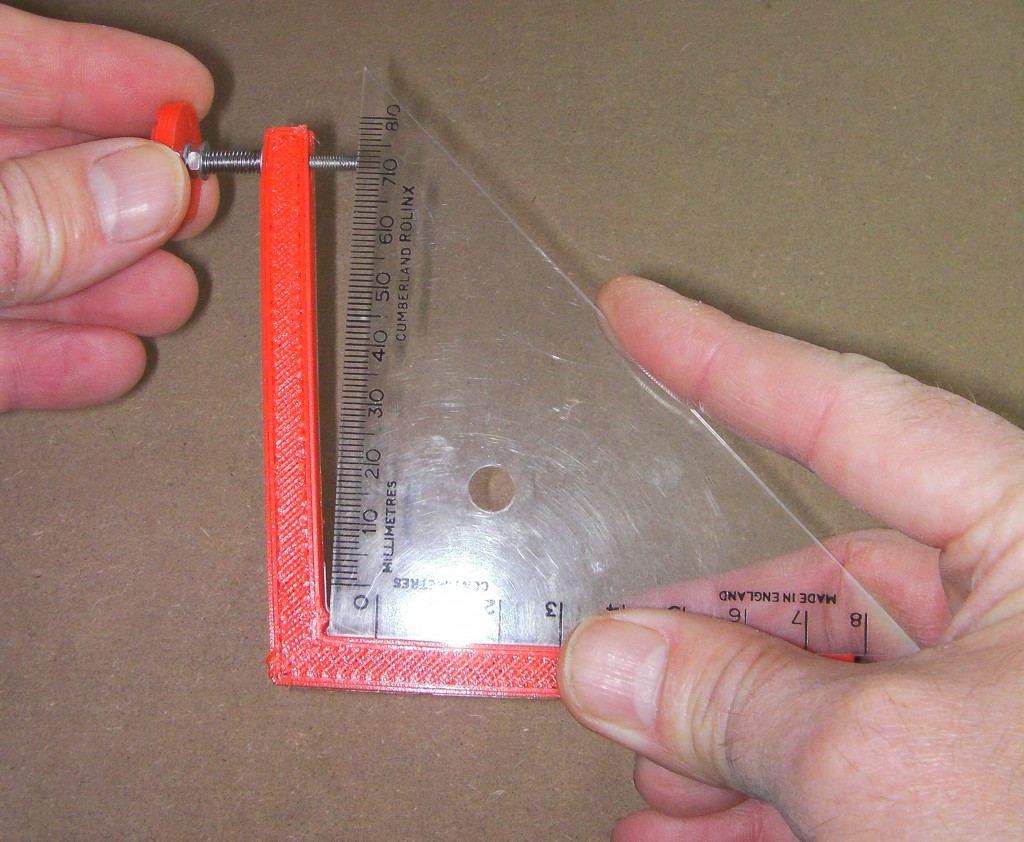
Now use a set square to set the screw at just the right position for a right-angle, as shown above. Push the set square against the small projection near the angle. But don’t force things or push too hard. You don’t want to distort the pieces.
Note the position of the mark you made on the thumbwheel.
Now take the three-legged test piece that you printed. Hold it in the same place as the set square, and see how much (if at all) you have to turn the thumbwheel to just touch it. Note down the turns, and whether they were clockwise/inward/acute-angle/negative or anti-clockwise/outward/obtuse-angle/positive.
Suppose you need 1.3 clockwise turns. The pitch of an M3 thread is 0.5mm, so this means that the axis pair you have measured is -0.65mm away from a true right angle.
You can take several readings and average them – always more accurate. If you do, re-zero with the set square before each reading.
Measure all three pairs of axes: XY, YZ and XZ and write down the measurement for each.
Finally, measure the distance between the tip of the projection near the angled corner and the center of the end of the screw. This should be 78mm, but it is best to measure it than to rely on the accuracy of your first print.
Suppose the XY, YZ and XZ measurements are XY = -0.65, YZ = 0.9, XZ = 0.2, and the screw distance is that 78mm. Then sending
M556 S78 X-0.65 Y0.9 Z0.2
to your Ormerod will cause it to correct for those angles between the axes when it prints.
It is best not to put the M556 command in your config.g file. That way your Ormerod will always start up in a raw uncompensated state. Instead put it at the end of the setbed.g file that you created above. Then, when you run that file, it will both set your bed plane compensation and axis compensation.
To check that the axis compensation has worked, apply it, print the test pieces again, and check them with the set-square and gauge. This time you should find that all three legs of the largest test piece are at right angles to each other.

