
We now have a Github repository for all the work on this project here. See that link for the entire project log.
If we want to print a shape, one of the things it would be useful to know is the inverse of the graph in the Project Log for 13 September. That is to say when printing a cylinder, given a radius, what voltage should we apply to achieve it? This is the inverse graph, together with its fitted cubic which tells us what voltage to apply to get what radius:
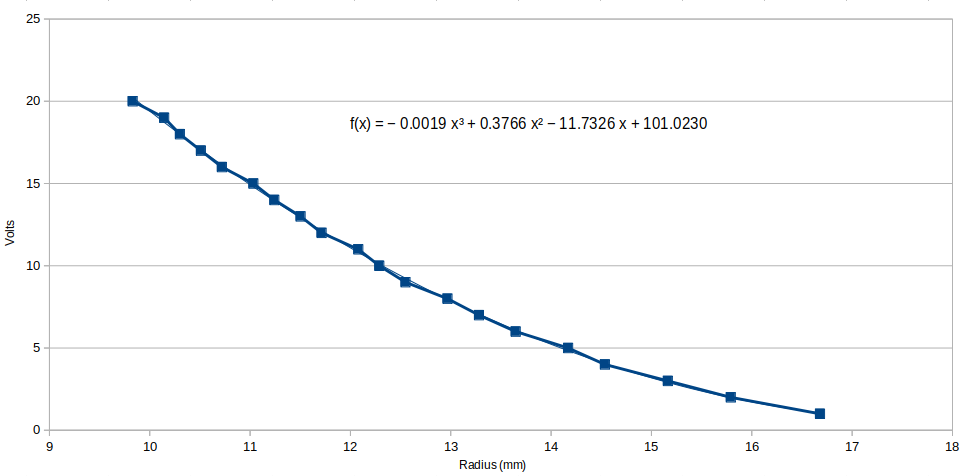
(Remember: the cubic is just an empirical fit to reproduce the curve; the coefficients have no physical significance.)
Now, as the voltages in the simulation are switched to the ring of contacts round the reaction vessel, the voltage can be set by a very simple ray-trace calculation across an imagined shape in the middle of the vessel – a rectangular block, say. The ray-trace gives the radius, and the radius gives the voltage to apply. Here is the simulated printed result:
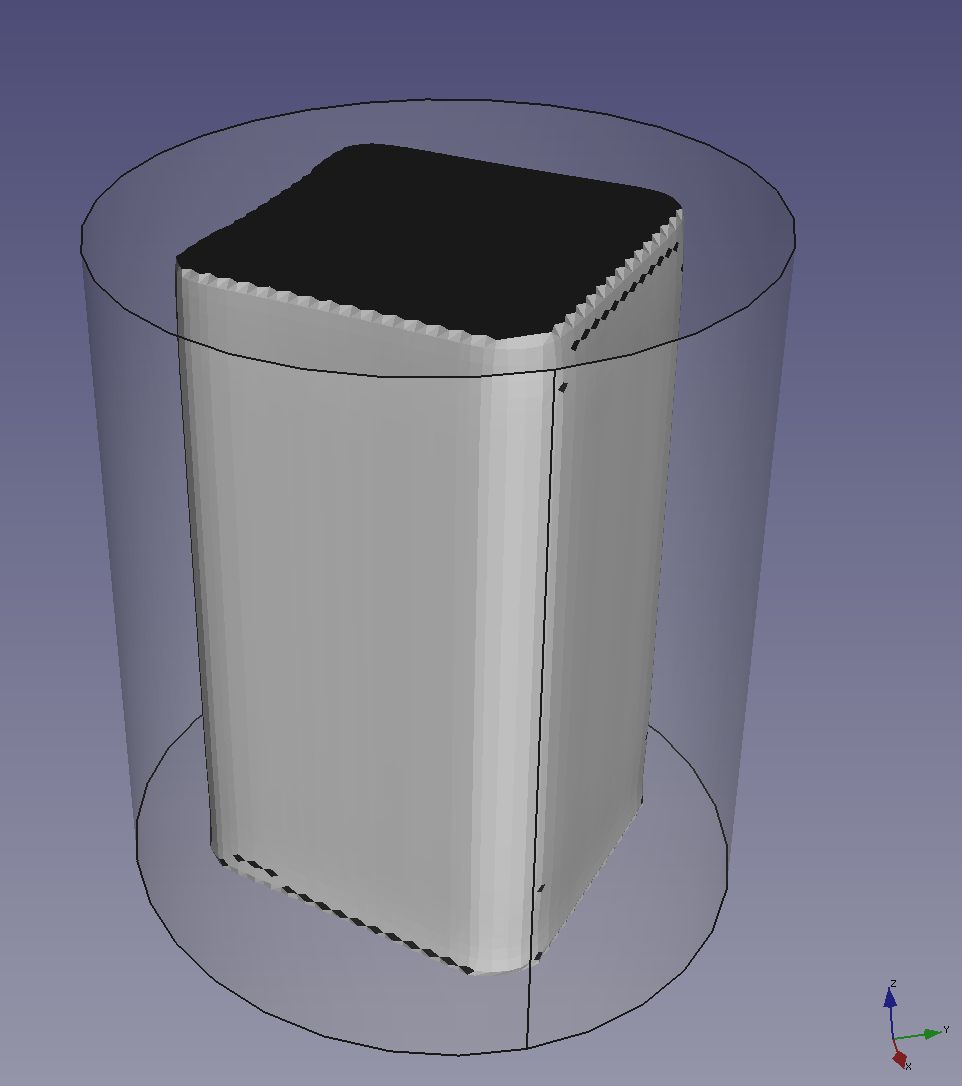
It prints, as requested, a rectangular block (the transparent cylinder is the reaction vessel, as in previous posts). The original block that was ray-traced had a square cross section 27x27x50 mm. The printed block is 25.5×25.5×50 mm. The slight reduction in size is possibly due to a cross-talk effect between higher and lower voltages, and layers influencing other layers above and below them. But the block’s faces are remarkably flat. The rounded corners are not a surprise, particularly given that the simulation only had a 50x50x50 node grid.
The block that was ray-traced then printed above was the entire height of the reaction vessel. Here is what is obtained if it is made shorter: 36mm high, placed 7mm up from the base of the reaction vessel, together with a 10mm diameter cylindrical stalk in the centre (which is rather like the support in conventional 3D printing needed to hold the object in place):
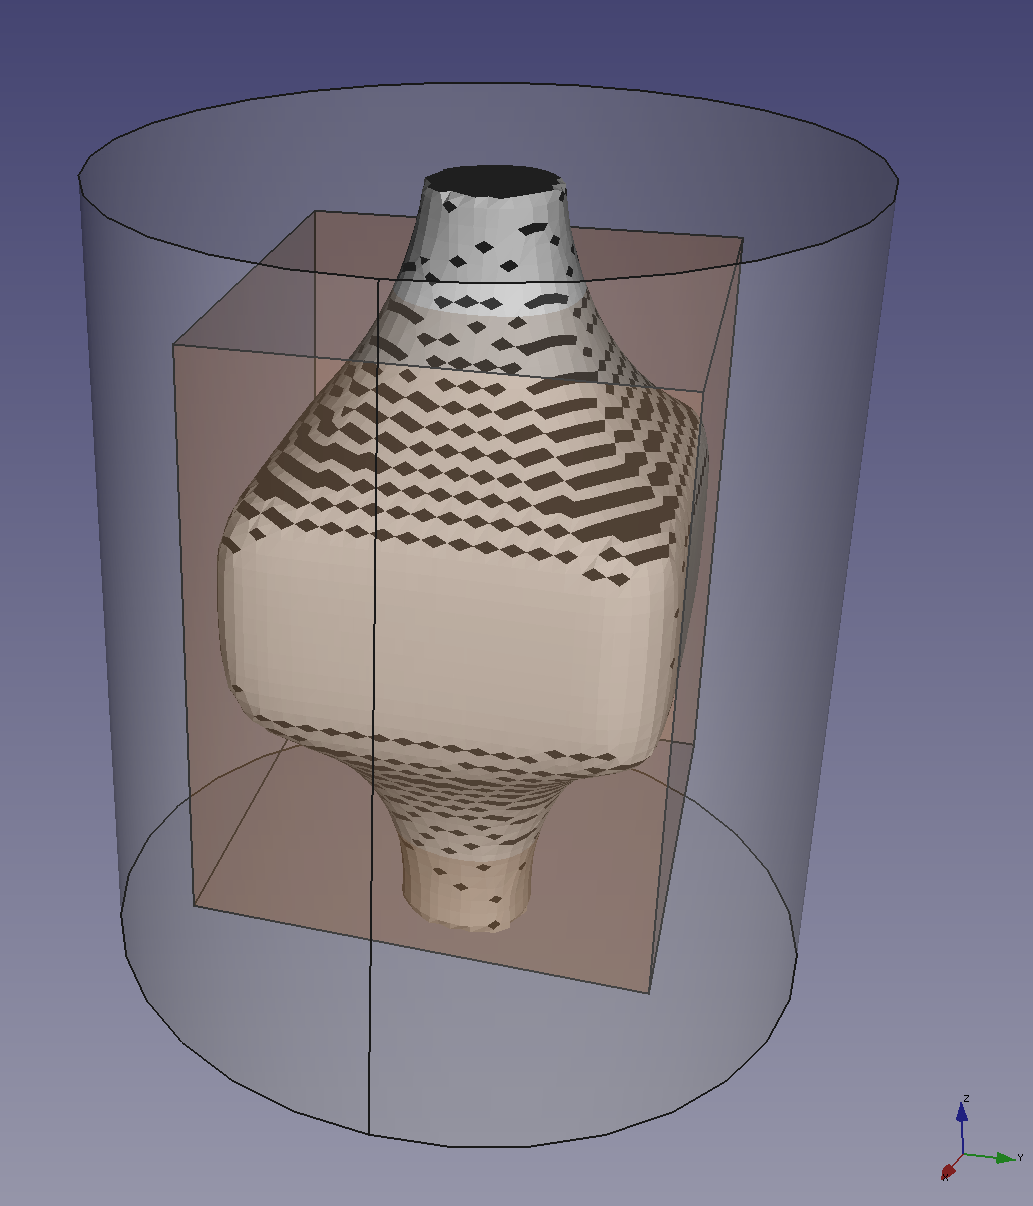
The original rectangular block that was ray-traced to create this is shown in transparent orange. As you can see, we still haven’t fixed the occasional dud triangle in the marching cubes program…
As you can also see, the effect of the high currents needed to reduce the diameter to that of the stalk top and bottom has been to erode the desired block as well. In addition, the comparitively low currents required for the rectangular block have meant that the stalk-cylinder gets fatter where it joins the block. In short, because the currents can flow freely in 3-dimensional space, there is a lot of vertical interference when trying to print in layered discs.
But, of course, with this method of 3D printing there is no need for, nor advantage to, treating the objects to be printed in layers. Any pattern of voltages can be applied anywhere over the surface of the cylindrical reaction vessel, and we have not tried using that extra freedom at all yet.
We think that will be the next step.
Connect with us
Keep up to date on the latest RepRap Ltd news:
This could be an interesting technology for synthetic biology. A gel would contain nutrients and cells, which are programmed to react to different AC frequencies or currents. Off hand I don’t know of any known genes or ready-built blocks that do this, but because proteins and cells really like to work with electrons and impedance tomography is quite useful with biological material, I would bet that such genes could be found and harnessed. At the very least they could be made to react to a voltage or current threshold, if not actual frequency.
The cells would then run a “program”, which can be any of a myriad of things. Bioluminescence in various colors is popular, but it could also metabolize sugar, produce proteins, or even build structures and tissues, maybe even wood-like or calcified. Addressing via electrode rings could be used to differentiate progenitor cells into specialized cells in a spatial pattern (think “3D printed organs”), but making things glow or just reproduce would be easier.
A similar device could be key to growing artificial meat, again because of the relatively cheap spatial effect (compared to CNC fluid applicators etc)
Interesting. I think that the best start would be to have the electrical signal activate or de-activate ligand/protein binding on the surface of the cells to cause them to adhere to one another and so form a solid, or separate. This would probably have to wait until the non-biological version was working to show that it does first, though.
Could you maybe create a straight path for the electricity by actually changing the conductivity of the printing media with some kind of laser or such, therefore, controlling precisely the path of the electric current.
That may be possible, yes. But you’d then need an arrangement to steer the laser, which would add mechanical movement to the machine. One of the original requirements was to try to make it with no moving parts, so it would be very reliable.
It is interesting that an electric 3D printer is used to print the perfect shape of a thing. When we want to create a model, then maybe the shape will not be perfect. So an electric 3D printer can solve the problem easily and it is easy to use too.