DRAFT – these instructions are not final, and are likely to change.
Idler
You will need the following parts:
| # |
Component |
Qty |
Type |
| 1243 |
Idler |
1 |
Printed |
| 279 |
623 bearing |
2 |
Hardware |
| 257 |
M3x12mm cap head screw |
1 |
Fastener |
| 212 |
M3 washer |
2 |
Fastener |
| 258 |
M3 nut |
1 |
Fastener |
|
Picture to come |
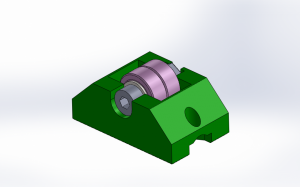
| Assemble the idler bearings as shown. |
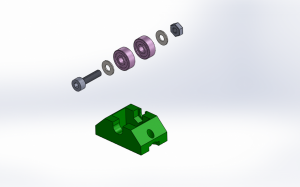 |
| The screw head and nut can then be seated into the idler. Make sure it is seated fully in, and the bearings are level with the idler printed part. |
 |
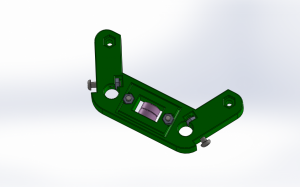
Idler bracket
You will need the following parts:
| # |
Component |
Qty |
Type |
|
Idler |
1 |
Assembled |
| 1244 |
Idler bracket |
1 |
Printed |
| 242 |
M3x16mm cap head screw |
2 |
Fastener |
| 258 |
M3 nut |
2 |
Fastener |
|
Picture to come |
| Push the M3x16mm cap head screws through the idler bracket, and push each M3 nut it its recess in the idler printed part. |
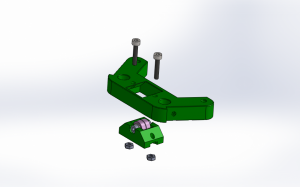 |
| Screw the idler up into the recess in the idler bracket. This will later be used to tension the drive belts, so may be left loose at this stage. |
 |
Completed assembly
You will need the following parts:
| # |
Component |
Qty |
Type |
|
Idler and bracket |
1 |
Assembled |
| 1186 |
M3x16mm button head screw |
2 |
Fastener |
| 258 |
M3 nut |
2 |
Fastener |
|
Picture to come |
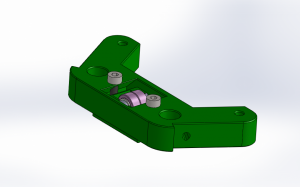
| Push the M3 nuts into their sockets in the idler bracket. |
 |
| Fit the button head screws, leaving them protruding at least 3mm. |
 |
Repeat
Now repeat the above steps until you have three assemblies.


