
Contents
Regular maintenance
Your RepRap will benefit from regular maintenance, which will keep it in good working order. We suggest:
Weekly schedule
- Depending on use, clean the bed surface with acetone, or other suitable cleaner (see ‘Cleanliness of build surface’ HERE for a list). This is actually more important if you have not used your RepRap much than if you have used it every day. Removing regular prints from the bed helps to keep it clean (as long as you don’t get your fingerprints on it).
- Retract filament to remove any debris swept into nozzle. If you do this hot, as described under ‘2. Nozzle blockage’ HERE, you can extract the filament down to the tip of the nozzle, pulling out any dirt right down to the tip.
- With the filament removed from the extruder, check that the hobbed insert is clean, with no filament stuck in its teeth.
- Do a visual check of the printer, looking particularly for anything loose. Check axes are moving freely.
Monthly schedule
- Wipe off any debris from the smooth rods with kitchen roll or similar, and put a drop of light oil (e.g. 3-in-1 oil) either side of each linear bearing. Then slide each axis back and forth to check movement is smooth and easy. Be careful not to drip oil on the bed; it will ruin part adhesion to the bed. If you are doubtful, take the glass off before you oil.
- Also put a drop or two of oil on the Z lead screw(s) above the Z nut(s), and drive the Z axis through its range.
- Check the screw terminals are tight on the main power wires, and all other cable connections are not loose. Loose power or bed connections will overheat, so also check for any evidence of this (such as wires becoming discoloured).
- Check machine for any loose fixings, and fraying wires.
- Depending on use (ours usually lasts 3 to 6 months, printing 18 hours a day, 6 days a week!), replace the Kapton tape on the bed.
If you move your printer
- Check frame for nuts and bolts that may have been loosened in transit.
- Check frame alignment and bed level – the printer’s alignment can be effected by the surface it stands on.
- Check wiring is all in place and connected before applying power.
Uploading new firmware
The firmware is the computer program that resides in the microcontroller chip on the controller printed circuit board. This section tells you how to upload a new copy of that program to your RepRapPro Melzi or Sanguinololu controller.
Important: If you have a multi-colour/multi-material RepRapPro RepRap, then you must first disconnect one end of the 4-way communications wire between the two controllers before you reload firmware into either of them. Reconnect it when you have finished reloading the firmware.
Required software
Arduino IDE
Arduino is the architecture of the main processor/microcontroller (see http://en.wikipedia.org/wiki/Arduino )
The Arduino IDE (Integrated Development Environment) allows you to upload the firmware to the board.
The current version of the RepRapPro Melzi firmware works best with Arduino IDE v1.0.6. It may fail to compile with later versions. Download the old version of Arduino IDE from HERE.
You may also need to install Java.
Sanguino hardware
What is Sanguino?! Sanguino is the basic architecture of the board (see http://sanguino.cc/ ). Sanguinololu is Sanguino, with the addition of stepper drivers. Melzi is based on Sanguinololu.
Do not download the drivers from Sanguino.cc; we supply modified drivers with our Marlin firmware, so the Arduino IDE software can talk to the Melzi.
The Bootloader
At times, you may see references to the bootloader. This is a piece of code that is flashed to the Arduino chip before firmware, to allow basic communications. If you have a RepRapPro machine, this has been done for you. It is part of the Sanguino code, and it tells the chip how to talk to the USB port; without it, it doesn’t know how. Flashing firmware doesn’t replace this or require that you flash the bootloader as well; it stays there all the time.
The only reason to reflash the bootloader is if the EEPROM on the Melzi has been completely erased somehow, or if you have replaced the chip on the board.
Git repository
Most of the data you need for RepRapPro hardware and software is in our Github repository. Firmware source code is stored in the RepRapPro git repository for Huxley and monochrome Mendel or RepRapPro git repository for multi-material/multi-colour Mendel.
Downloading from Github
Navigate to the appropriate page for the firmware you need (see above). The button to download a ZIP file is on the right-hand side (the little picture of a cloud with a down-arrow labelled ZIP).
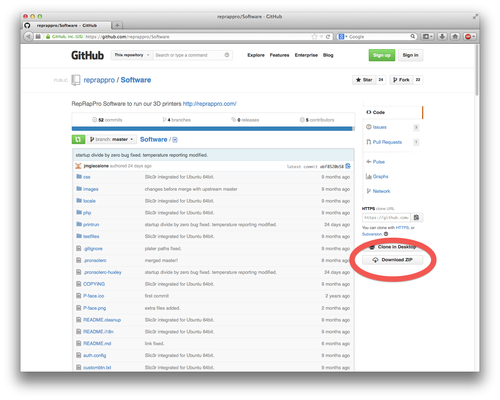
Download the zip file appropriate to your machine (the little picture of a cloud with a down-arrow labelled ZIP) and then extract the ZIP to your drive. It will create a folder called ‘Marlin’. Move this into a sensible folder (like ‘My Documents’), where you can easily find it.
Copy the whole ‘Sanguino’ folder (and it’s contents) from the ‘Marlin’ folder to your ‘/Arduino/hardware/’ folder. This gives the Arduino IDE the support files for the Melzi hardware.
Uploading firmware to your Melzi
In order to upload firmware into the controller you need to make sure that the board’s reset jumper is installed:
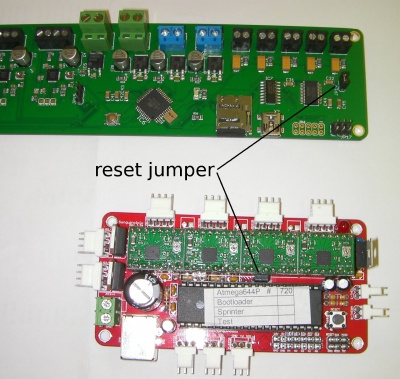
You can take it off when you have finished uploading. Hang it on one of the pins so it doesn’t get lost.
Open Arduino IDE, then open the .ino file for the appropriate firmware from the Marlin folder (‘Marlin.ino’ or ‘Slave.ino’). For quick and easy access to firmware through the ‘File | Sketchbook’ menu in Arduino, set the ‘Sketchbook location:’ in the ‘File | Preferences’ menu to the folder containing the Marlin folder, eg ‘My Documents’.
Select ‘Sanguino W/ATmega1284p 16 mhz’ from the Tools | Board menu. If you can’t see the Sanguino boards in the board list, check that you copied the Marlin / Sanguino folder to your /Arduino/hardware/ folder – see above.
Check the correct serial port is ticked in the Tools | Serial port menu (the RepRap controller board must be physically connected to your computer with the USB cable at this stage).
Marlin Firmware Configuration
Huxley / Mendel / Mono Mendel / Tricolour Mendel Master
Select the tab for the file Configuration.h. At the top are the following lines:
// Uncomment ONE of the next three lines - the one for your RepRap machine
//#define REPRAPPRO_HUXLEY
//#define REPRAPPRO_MENDEL //Legacy Mendel
//#define REPRAPPRO_MENDEL2 //Tricolour

// Uncomment ONE of the next three lines - the one for your master controller electronics
//#define REPRAPPRO_MELZI
//#define REPRAPPRO_SANGUINOLOLU
//#define REPRAPPRO_DUE

// Uncomment ONE of the next two lines - the one for the series resistors on your controller
//#define SERIAL_R 4700
//#define SERIAL_R 10000

// Uncomment the next line if your machine has more than one extruder
//#define REPRAPPRO_MULTIMATERIALS
As necessary, uncomment (i.e. remove the two // characters) from the lines corresponding to your machine and control electronics.
Leave any line that DOES NOT correspond to your machine and control electronics commented out (i.e. leave the two // characters) .
Most Melzi and all Sanguinololu controllers should have this line uncommented:
#define SERIAL_R 4700
Some Melzi controllers shipped with a different resistor; you need to look at the resistor value on the printed circuit board:
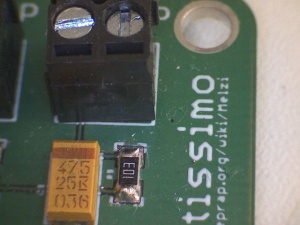
The screw connector at the top of the picture is the one for the hot-end thermistor. Just behind it you can see a small black resistor with 103 written on it. That is a 10K resistor (the last digit is the number of zeros – sometimes it will say 1002, which is obviously also 10K). If your board has that, uncomment the
#define SERIAL_R 10000
line, and comment out the
//#define SERIAL_R 4700
line.
If you have a Tricolour/multi-material/multi-colour Mendel, you should be using the ‘multimaterials’ firmware branch from our github repository; uncommented the following line. For all other machines (Huxley, Legacy Mendel and Mono Mendel), leave it commented out.
//#define REPRAPPRO_MULTIMATERIALS
Tricolour Mendel / Multimaterials Slave
The slave board on a Tricolour Mendel / Multimaterials uses different firmware from the master board. In Arduino, open the firmware ‘Slave.ino’ in the ‘Marlin | Slave’ folder. No configuration is necessary. Remove the master to slave communication cable, and install the autoreset jumper. Plug the USB cable directly into the slave Melzi, and upload as above.
Marlin Firmware Upload
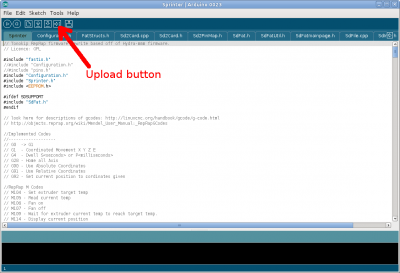
To upload your firmware, click the Play button (the first button) to verify that the code compiles correctly. It should respond with:
Done compiling.
Binary sketch size: [XXXX] bytes (of a [XXXX] byte maximum)
If you don’t get this, you’ll get an error message. Check you installed all the necessary software parts, that you made no errors in the firmware editing, and that you selected the right option under the Tools | Boards and Tools | Serial Ports menus. The compile needs to be error-free before moving on to the next step.
Click Upload (the second button with 1.0.4 and later) to send the firmware to your Melzi. A message will show that the firmware is compiling as above, then uploading. Once it has finished, it should say “Done uploading” and the LED will come on on the Melzi.
If you get an error message, try uploading again. Check that you installed the autoreset jumper – it is needed for firmware uploading. Remove it after the firmware has uploaded. Alternatively, press the reset button on the Melzi just after you press ‘Upload’ in Arduino.
Simple Melzi Test
Having trouble getting uploads to work? Follow these steps…
Here is a short program that should cause the Melzi LED to blink and nothing else:
const int ledPin =  27;
int ledState = LOW;
long previousMillis = 0;
long interval = 1000;

void setup() {
  pinMode(ledPin, OUTPUT);
}

void loop()
{
  unsigned long currentMillis = millis();

  if(currentMillis - previousMillis > interval) {
    previousMillis = currentMillis;
    if (ledState == LOW)
      ledState = HIGH;
    else
      ledState = LOW;
    digitalWrite(ledPin, ledState);
  }
}
Make sure you are running Arduino version 1.04(http://arduino.cc/en/Main/Software) and that you have installed the Sanguino files.
Leave the main RepRap power supply disconnected.
Connect the power jumper on your Melzi (the one near the middle of the board) for USB power (jumper the two pins of the three on the reset button side), and connect the reset jumper (the one at the etemp connector end of the board). Plug the Melzi USB into your computer and run the Arduino development environment.
Under Tools->Board select “Sanguino W/ATmega 1284p 16 mhz”.
Copy and paste the above program into the window and select upload (the button with the right-pointing arrow). If it fails, unplug the USB lead from the computer, wait a few seconds, plug it back in, and try again.
The program should compile then upload, and the on-board LED should then blink at 1 Hz.
Of course, you now have to upload the proper firmware, as described above…
Dismantling the hot end
With care you can completely to dismantle the hot end:
- Cut the PLA filament so that you have about 300 mm sticking out of the feed side of the drive.
- Loosen the spring screws on the drive (or remove them) so that the filament is not being gripped at all.
- Pull the tongue out of the drive to release the brass coupling. Pull the filament through the drive so the PTFE tube and filament are free.
- Run the hot end up to temperature, and wait for about 30 seconds.
- Push the filament through by hand so that it extrudes slowly. Push about 100mm of filament through to get fresh material right through the hot bit.
- Turn the heat off, and watch the temperature as it cools. Clean any extruded filament away from the end of the nozzle.
- When it gets down to 100 C, pull the free end of the filament gently but firmly. At that temperature the plastic should be soft enough to come out of the heater assembly, stretching a bit. But it should be coherent enough to hold together; it should all come out, right down to the nozzle, leaving the filament path completely empty.
- Disconnect the power and wait for everything to get to room temperature.
- Disconnect the hot end wires from the controller board, and slacken the two screws that hold the hot end to the X carriage. Take the hot end off the machine.
- Cut the cable ties on the fan heatsink that retain the wires.
- Unscrew the fan and heatsink and set them aside.
- Unscrew the PTFE cone at the bottom of the nozzle, and set that aside. For the next three steps, take care not to damage the wiring as you unscrew things. Take your time and hold the wires out of the way.
- With long-nosed pliers unscrew the brass end of the PTFE tube from the long block. Set the PTFE tube aside.
- Unscrew the long block from the short double-threaded stainless steel tube. Set the long block aside.
- Retrieve the short length of PTFE from within the counterbored recess in the stainless tube. Set it aside.
- Carefully remove the crimps from one end of the thermistor wire and the heater resistor wires.
- Pull the heater resistor and the thermistor out from the other end of the aluminium block.
- Gently hold the aluminium block in a vice, and use an adjustable spanner on the flats of the brass nozzle to unscrew that.
- Unscrew the stainless steel tube, taking care not to damage its threads if you have to grip it.
- Clean all residues of PTFE tape from the components.
To reassemble the hot end, follow the instructions on the hot end assembly page for Huxley here and for Mendel here.