Contents
Goal
| By the end of this stage your extruder drive will be mounted on your Mendel. | 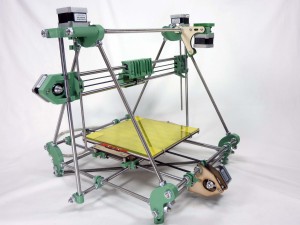 |
|
Assembling the drive
| Note: all parts for the extruder drive are supplied in a single bag. |  |
|
Filament drive large gear assembly
|
 |
|||||||||||||||||||||||||||||
Extruder block assembly
| Insert a 623 bearing in the back of the drive block as shown. You may need to clean the hole a little. Trim around the edge of the hole with a craft knife. Check the other holes at the same time – it’s quite a complex part to print. |  |
|
| Mount the extruder block on the motor using two M3x20mm cap head screws. Put the 4mm thick-spacer between the block and the motor. Note the orientation of the motor, specifically the wiring connector. This needs to be oriented as shown, to match the wiring loom. |  |
|
| Fit the small gear. You may find this easier if you use a sharp blade to put a slight chamfer on the underside of the gear where it meets the motor shaft. Push the small gear onto the shaft such that its top is flush with the end of the shaft. You may need to tap it with a soft hammer or block of wood – take care, and support the back of the motor shaft as you do this, rather than the motor’s body. |  |
|
| Put an M3x30mm cap screw into each of the holes shown, with a nut (no washer) in the groove on the other side. These screws tension the idler bearing, which pushes the filament onto the hobbed insert, for better grip. Leave the screws loose for the moment. |  |
|
| Fit the idler bearing in the slot, and push the M3x12mm cap head screw through the extruder body and it, as shown. The screw needs no nut to retain it. |  |
|
| In order to tension the idler mechanism, tighten the two M3 cap screws until they have flexed the extruder body so the two sides of the slot just touch at the top, but no tighter. Later you can adjust these for idler tension on the filament. |  |
|
| Push the gear and hobbed insert assembly into its hole in the block. Rotate the gear as you do this so that it meshes with the small gear on the motor. Note that the gear and hobbed insert assembly is designed so that the action of driving the filament tends to tighten the hobbed insert on the M3 thread. |  |
|
Checking and adjusting extruder function
| With no filament in the drive, turn the large gear by hand, and check that it moves smoothly and easily. You may find that it is stiff to turn (either all the time, or at certain points), or the top of the small gear catches on the large gear. Loosen the two M3x20mm screws that hold the motor to the extruder body, and turn the large gear a few times. There is a small amount of play in these screws, which should allow the motor to move a little, and reduce the gears binding. |  |
|
| If the gears still seem stiff, particularly at certain points on the large gear, check for poorly printed teeth, blobs or other debris in the teeth. You should be able to tidy this up with a craft knife. If the top of the small gear binds on the large gear, you may need to add a washer, between the large gear and the 623 bearing, to lift it above the small gear a little. (Picture does not show the extra washer.) |  |
|
| Cut a piece of filament 50cm long from the filament that was supplied with your printer. Insert the filament into the drive – it feeds in the hole in the top of the drive, under the large gear. Turn the gear, so the filament engages with the teeth of the hobbed insert. Turn the gear a few times, until the filament emerges from the bottom hole. |  |
|
| Again, check that the gears mesh and rotate smoothly for a few revolutions of the large gear. You can do the same trick with slackening off the motor screws, if it’s tight. |  |
|
| Changing the tension on the idler bearing will also effect the resistance the large gear has to turning. The hobbed insert should have a good grip on the filament, but not too strong. When you hold the gear still, it should not be possible to pull the filament back out of the drive by hand. If it slips, tighten the two nuts slightly. You want the large gear to be as easy to turn as possible, while still being strong enough to pull filament in without slipping when you apply some resistance to the filament. |  |
|
| If the filament stops moving, but the extruder drive keeps turning, or the filament is slipping in the extruder drive, most likely the hobbed insert has slipped on the filament and some plastic has got stuck in the teeth of the hobbed insert. The large gear can also be easily removed for cleaning the hobbed insert, when there is no filament in the drive. Use a pointy tool, or a wire brush, to clean it. When filament is inserted, it retains the gear assembly in place, as the filament fits in the slight dent formed by the hobbing. Also check that the hobbed insert is still tight. |  |
|
Fitting the drive
|
Picture to come |
| For one of the mounting screws, there is a nut trap for an M3 nut, just below the small gear in the picture. Drop an M3 nut into this. |  |
|
| Insert an M3 nut into the captive slot of the extruder drive mount bar clamp. | 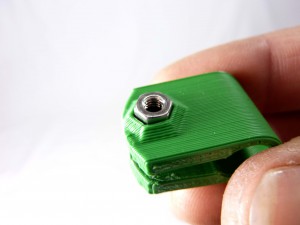 |
|
| Snap the bar clamp over the M8 threaded rod on the rear left of the machine. This is the default position for extruder 1. | 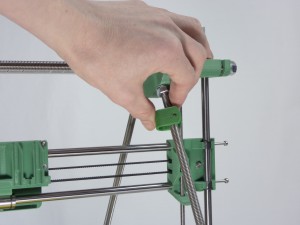 |
|
| Attach the extruder drive to the Extruder drive mount, using the M3x20mm screw with an M3 washer under the head in hole closest to the frame, and an M3 nut on the back, and an M3x35mm screw and M3 washer going into the captive nut. Check the following photos to make sure you have the orientation right. When mounted to the machine, the extruder drive should be on the outside, and the wooden piece on the inside. | 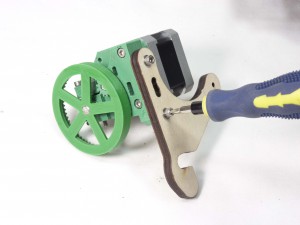 |
|
| Loosen the M8 nut at the front of the machine, clip the extruder drive mount onto the frame and retighten the nut. | 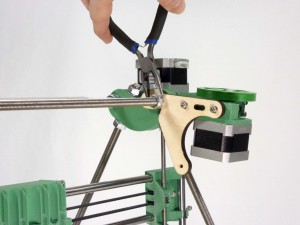 |
|
| Slide the extruder drive mount bar clamp so that the hole lines up with the extruder drive mount hole. Insert an m3 washer onto an M3x20 cap screw, through this hole and into the captive nut of the extruder drive mount bar clamp. Tighten as needed. | 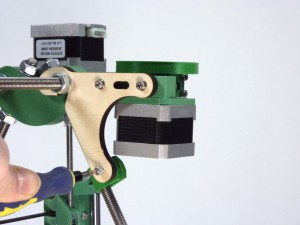 |
|
The Tongue
|
 |
|||||||||
| You will be left with one small printed part left over; the tongue.It will hold the Bowden cable into the extruder drive, and is fitted in the ‘hot end’ section of the instructions. Keep it safe for the moment |  |
|
Extruder drive completed
| The completed assembly. Should you ever need to reprint an extruder drive, because it is common to both Huxley and Mendel printers in our range, it has a separate repository on github, HERE. |  |
|


