
Build Instructions – Base Assembly – Tower Assembly – Panels and Rods – Effector Assembly – Extruder Drive
Hot End Assembly – Electronics – Bed, Top Plate and Belts – Commissioning – Printing – Troubleshooting
Overview
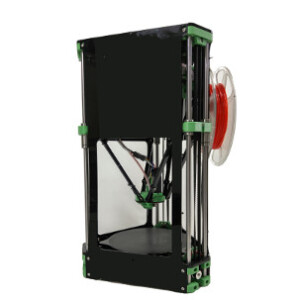
The Fisher Delta 3D printer is a fast-to-assemble, networked 3D printer with bed probe for full geometric compensation. These pages are the complete instructions for building, commissioning and using the Fisher Delta 3D printer. Like all RepRap machines, it is fully open-source, licensed under the GPL. All the design files and software are available from our Github repository.
The Fisher Delta 3D printer is fitted with the open-source Duet electronics.
If you want to print the plastic parts for a Fisher Delta 3D printer, see below.
These instructions were written by Ian Stratford, RepRapPro, Jean-Marc Giacalone, eMAKER Ltd and updated in 2019 by Sally Bowyer and Adrian Bowyer, RepRap Ltd.
General Notes
- BEFORE YOU ATTEMPT TO ASSEMBLE ANY PART OF THE FISHER DELTA 3D PRINTER, PLEASE READ THESE BUILD INSTRUCTIONS FULLY AND ENSURE YOU UNDERSTAND THEM. Although all parts are covered by warranty, this will be invalidated by your not following these build instructions. You are building a complicated machine; many different skills are required to build, to commission and to operate a 3D printer. Try not to rush your build, or you may miss out something vital.
- Give yourself plenty of space and ensure your work area is clean. Dust and dirt are a 3D printer’s worst enemy.
- All printed parts have been printed on RepRap machines Some holes and features may need a little fettling to get the best performance from the Fisher Delta 3D printer. There is a video how-to on fettling 3D printed parts here on Vimeo. It is best to try parts first, and only to do this if you find it’s needed as you work through the instructions.
- Before you start the build, please ensure you have all the components as listed on the packing list included in the kit. If anything is missing or damaged, please contact your supplier.
- We understand that people may want to change aspects of the machine’s design, and in fact we encourage this as it is one of the benefits of open-source development. Before changing anything, please be aware that the Fisher Delta 3D printer has been designed to maximise its build volume relative to the the machine’s footprint, and as such many of its components fit closely to others. So consider your changes carefully before you try to implement them. And when you find improvements, please tell us and the world so that we can include them in future kits, and so that existing owners can upgrade their own machines.
- The Fisher Delta 3D printer is a robust RepRap machine once assembled; however it does require a certain amount of care during assembly. If in doubt, force is usually not the answer…
Fisher Versions
The current version of Fisher we are shipping is 1178.3. You can find the version of your Fisher on the packing list shipped with your kit.
1178.3 – Ships with Duet Maestro. Changes to packing and instructions. August 2019
1178.2 – Ships with MasterSpool Filament Reel. Changes to packing. April 2019
1178.1 – This was the version we took on from eMAKER. March 2018
Printing parts for Fisher
If you have bought the hardware-only or maker version of the Fisher kit, you will want to print and/or laser cut the parts. You may also want to print/cut spare parts for your printer. Parts are available as STL and DXF files (as appropriate).
The latest versions of parts (which should generally be backwards compatible with previous versions of Fisher) are available in the Fisher GitHub repository.
You can download the whole GitHub repository, or download the parts individually. The list below shows the part number, part name, quantity and location of the parts. The ‘Location’ links to the parts page. This will also help you identify the parts, as it shows a preview of the part (STL only).
STL parts (for printing) are in the Fisher/stl folder.
| # | Description | Qty | Location |
| 1243.1 | Idler | 3 | Fisher/stl |
| 1245 | Kinematic Mount | 3 | Fisher/stl |
| 1247.1 | Nozzle Duct | 1 | Fisher/stl |
| 6197 | MasterSpool Spigot | 1 | Fisher/stl |
| 1285 | Idler bracket | 3 | Fisher/stl |
| 1301 | Effector | 1 | Fisher/stl |
| 1304 | Carriage | 3 | Fisher/stl |
| 1305.1 | Motor bracket | 12 | Fisher/stl |
| 1306 | Drive block | 1 | Fisher/stl |
| 1309 | Lower Lever | 1 | Fisher/stl |
| 1310 | Small gear | 1 | Fisher/stl |
| 1311 | Large gear | 1 | Fisher/stl |
| 6199 | Filament Guide Spacer | 1 | Fisher/stl |
DXF parts (for laser cutting) are in the Fisher/dxf folder. The DXF files may contain multiple parts.
| # | Description | Qty | Material | Location |
| 1232.1 | Rod | 12 | 3mm Acrylic | Fisher/dxf/1195.2.DXF |
| 1302.1 | Front Panel | 2 | ||
| 1298 | Bed Spacer | 3 | 3mm Acrylic | Fisher/dxf/1196.2.DXF |
| 1303 | Side Panel | 1 | ||
| 1307 | Drive block spacer | 1 | ||
| 1308 | Upper Lever | 1 | ||
| 1223 | Effector Plate | 1 | 3mm MDF | Fisher/dxf/1223.DXF |
| 1284 | Top Plate | 1 | 5mm Acrylic | Fisher/dxf/1284.DXF |
| 1287 | Bed | 1 | 5mm Acrylic | Fisher/dxf/1287.DXF |
| 744 | Duet PCB spacer | 4 | 5mm Acrylic | Fisher/dxf/1299 – 00.DXF |
| 1299 | Base Plate |
Get support
If you find you need help or advice with assembling, commissioning or using your Fisher Delta 3D printer, you can use the following channels:
- Check the instructions again – most issues people have are from not following the instructions (yes, really!).
- Contact the support department of the company that sold you your printer.
- Check the Fisher discussion forum on the RepRap Project Forum.
Tool and materials List
Tools and materials required for the build of the Fisher Delta 3D printer:
Required
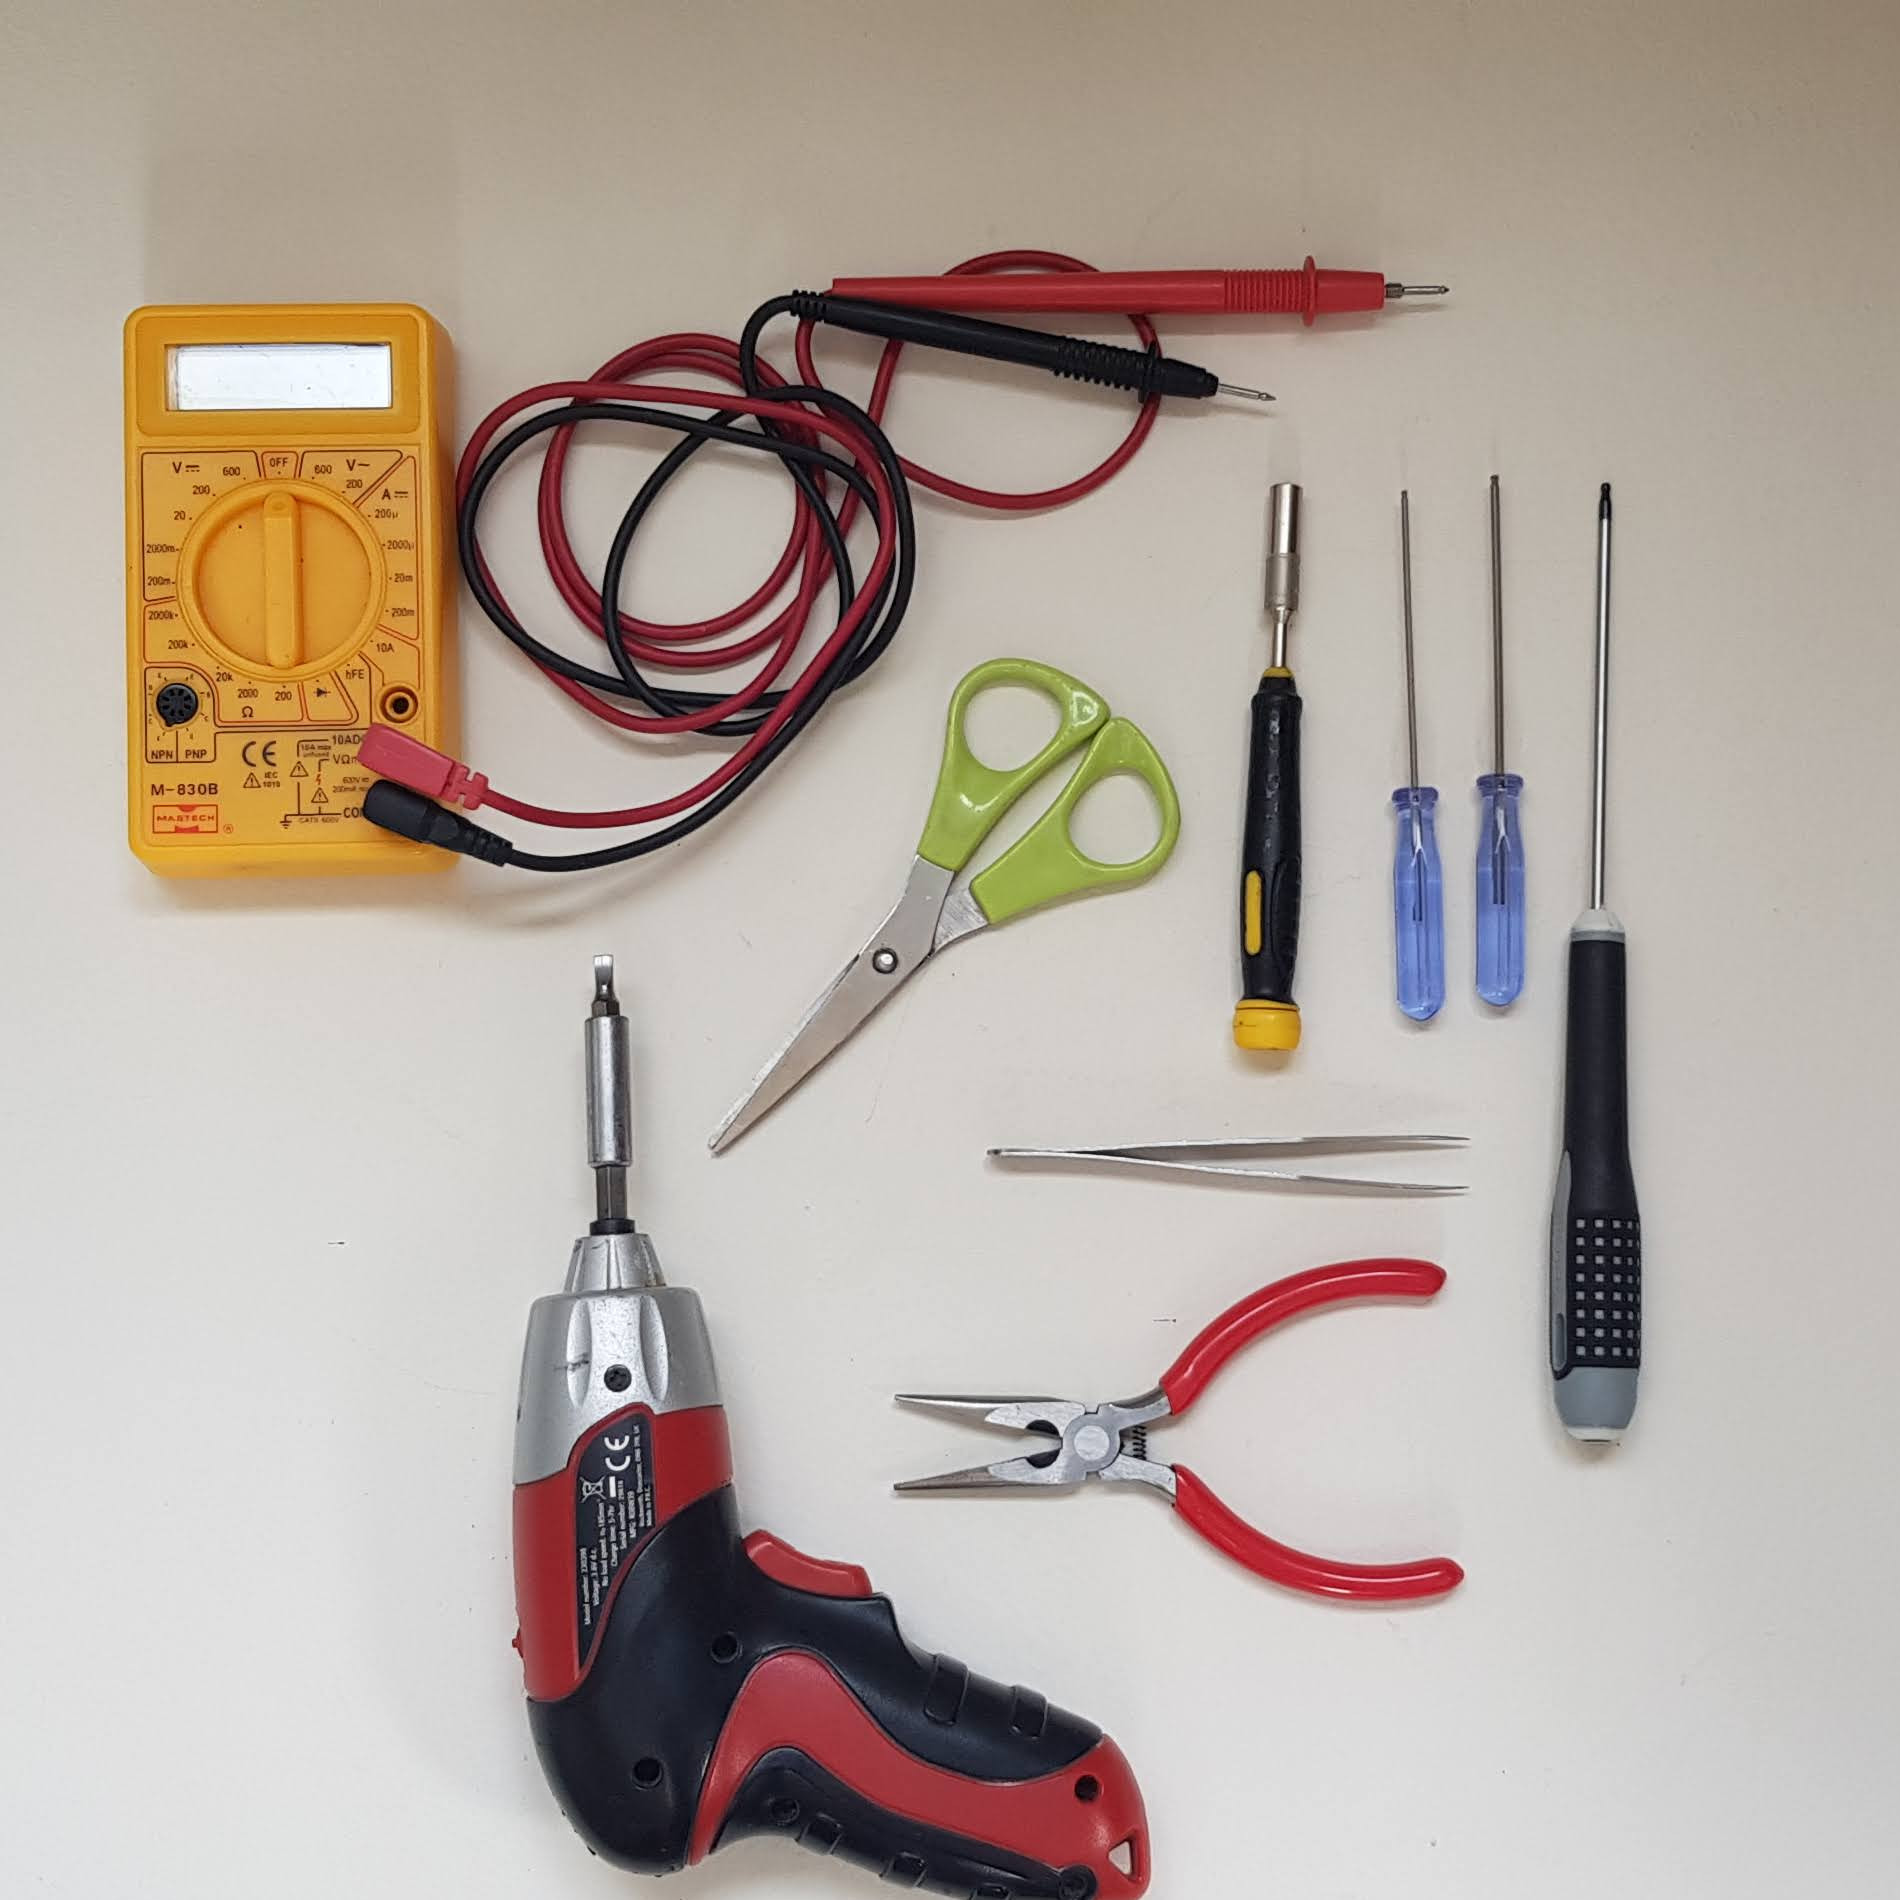
- Allen keys: 1.5mm, 2mm, 2.5mm (the long reach type, with a ‘ball’ hex on the end, are very useful)
- 5.5mm (M3) socket and/or spanner
- Fine tweezers
- Fine-nosed pliers
- Scissors
- Small, flat-bladed, electrical screwdriver (electric one shown; nice, but not necessary).
- Digital Multimeter
- 10mm spanner (not shown in photo)
- 8mm spanner (not shown in photo)
- Superglue (not shown in photo)
- Sticky tape (not shown in photo)
- Small quantity of light machine oil, such as 3-in-1 (not shown)
For adjusting plastic parts, if necessary
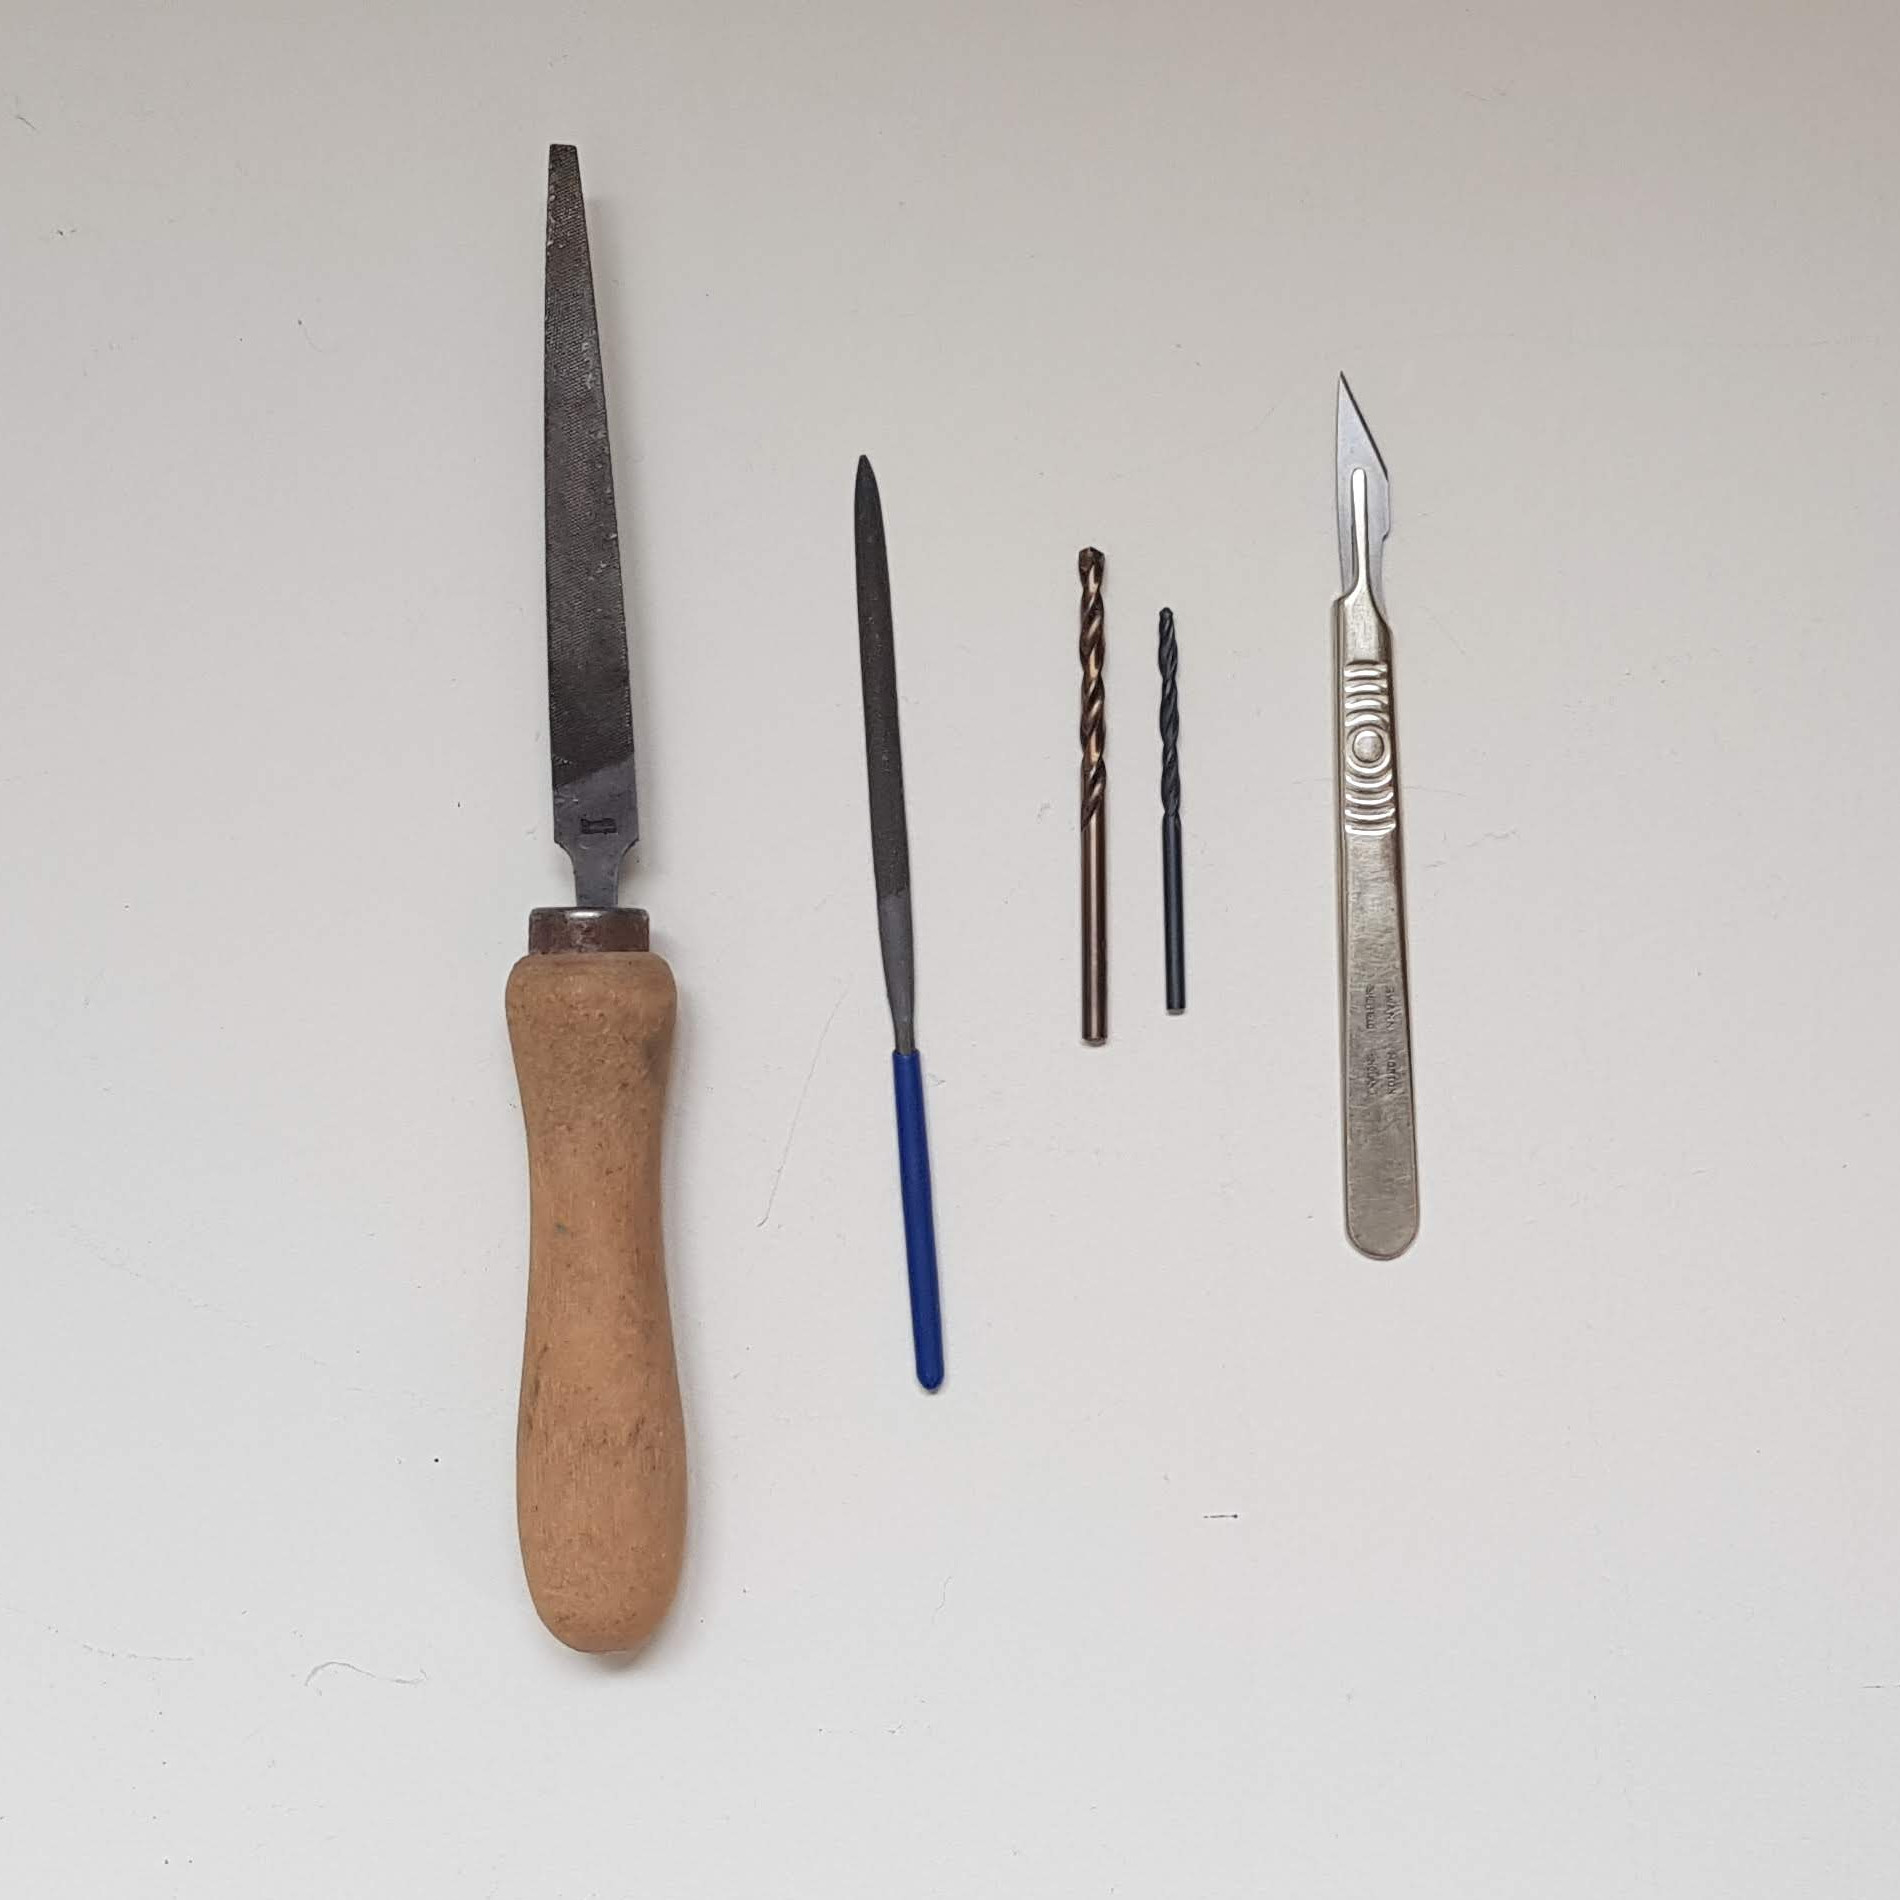
- Drills: 3mm, 4mm
- File
- Half round needle file
- Sharp craft knife
Nice to have, but not necessary
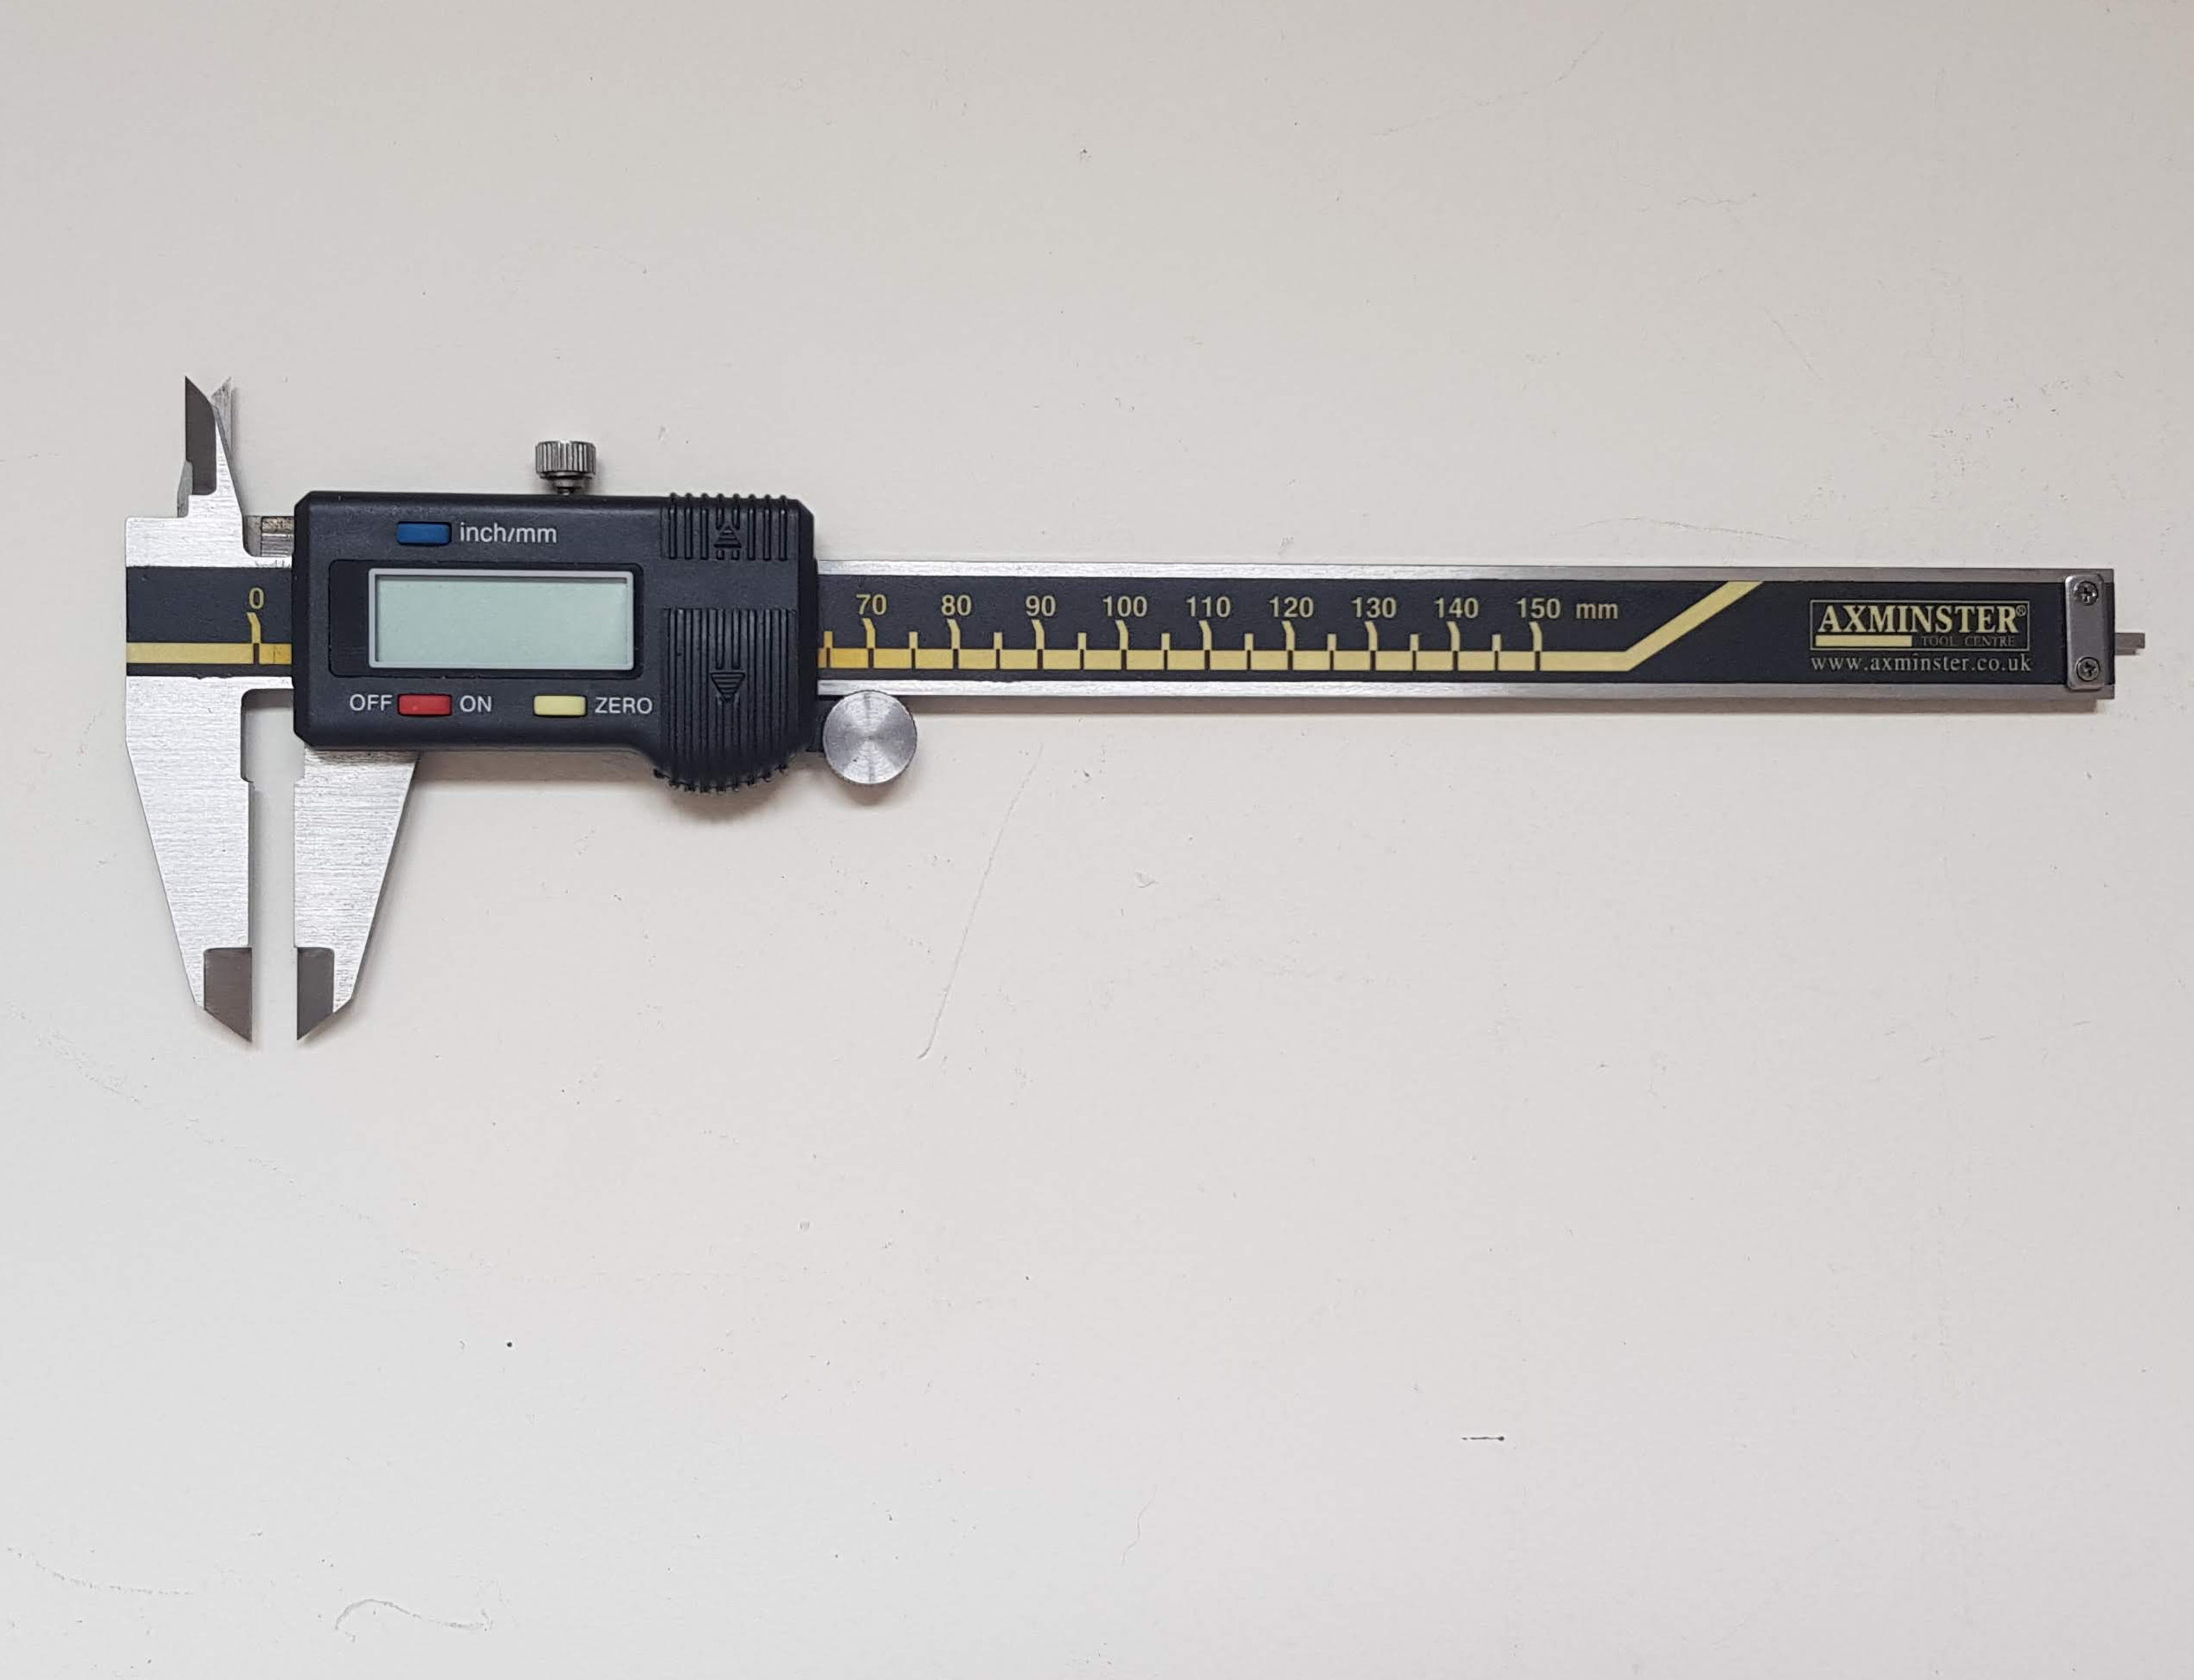
- Vernier or digital calipers
- Rubber or surgical gloves
Technical terms
Throughout these instructions there are references to parts using standard engineering terms. Here are some common ones:
- Cap head screw – this is a screw with a cylindrical head and a hex socket for an Allen key.
- Button head screw – this is a screw with a part-spherical head and a hex socket for an Allen key.
- Grub screw – a small screw with no head and a hex socket sunk into its shaft.
- Hex head screw – a screw with a hexagonal head, as might be turned using a spanner.
- Mn nut or screw – metric M-series fastners. The number is the thread diameter in millimetres. M3x25mm is a 25mm long M3 screw.
- Nylock nut – a nut with a plastic insert that prevents it from vibrating undone.
- Plain washer – an ordinary (as opposed to spring) washer.
- NEMA nn – an industrial standard range of electric motor sizes (National Electrical Manufacturers Association).
- Linear bearing – this is like a ball bearing (indeed, it contains small rolling balls), but for moving along a straight rod.
- 623 bearing – a ball bearing 10mm in diameter and 4mm thick.
- Microswitch – a small electrical switch activated by a lever hinged on one edge.
- Cable tie – a plastic ratchet strip that can be pulled tight round cable bundles.
- PTFE tube – a translucent hard plastic tube with very low internal friction.
- MDF – a fibrous wood substitute.
- Hobbed – a cylinder with axial grooves made by hobbing.
- Pneumatic fitting – in Fisher these are not used for compressed air (which they’re designed for), but for gripping tubes.
- Nozzle – a threaded tube with a small hole in the end from which molten plastic is extruded.
- Hot end – the assembly round the nozzle that heats it, cools other parts of it, and fixes it to the machine.
- Extruder drive – the mechanism that pushes plastic filament through Fisher to the hot end.
- Heatsink – a finned aluminium cylinder designed to dissipate heat into flowing air.
- Bowden Tube – a tube through which plastic printing filament is pushed, by analogy with a Bowden cable on a bicycle.
- PCB – printeed circuit board.
- Cartridge heater – an electrical resistor encased in metal that acts as a heater.
- Thermistor – a resistor that changes its value with temperature. Used as a thermometer.
- Heatshrink – a plastic tube that shrinks on heating, encasing whatever is inside it firmly.
- Loom – two or more wires in a bundle.
- Spacer – a small cylinder that fits on a screw thread to position something correctly.
- Jack – a type of electrical plug or socket.
- DC – direct current.
- Buildtak – a thin adhesive plastic sheet designed for 3D printing on.
- Acrylic – the plastic material that Fisher’s lasercut sheet parts are made from.
- Spigot – a projection cantilevered out from a vertical surface.
- Timing Belt – flexible belt with regular indentations that prevent it from slipping.
- SD card – a small plug-in computer memory card.
- Ethernet – cable local area network. All home network hubs have Ethernet connectors.
Acknowledgements
Our customers have made suggestions for improvements in these instructions. We would like to thank Derek Fountain and Andrew Chapman for many such suggestions, which are incorporated in the pages that follow.
Continue to Base assembly