Contents
Regular maintenance
Your RepRap will benefit from regular maintenance, which will keep it in good working order and improve the quality of your prints. We suggest:
Weekly schedule
- Depending on use, clean the bed surface with acetone, or other suitable cleaner (see ‘Cleanliness of build surface’ HERE for list).
- Retract filament to remove any debris swept into nozzle. If you do this hot, as described under ‘Nozzle blockage’ HERE, you can extract the filament down to the tip of the nozzle, pulling out any dirt right down to the tip.
- With the filament removed from the extruder, check the hobbed insert is clean, with no filament stuck in its teeth.
- Do a visual check of the printer, looking particularly for anything loose. Check axes are moving freely.
Monthly schedule
- Wipe off any debris from the smooth rods with kitchen roll or similar, and put a drop of light oil (eg 3-in-1 oil) either side of each linear bearing. Then slide each axis back and forth to check movement is smooth and easy. Be careful not to drip oil on the bed; it will ruin part adhesion to the bed.
- Also put a drop or two of oil on the Z lead screw(s) above the Z nut(s), and move the Z axis through its range.
- Check the screw terminals are tight on the main power wires, and all other cable connections are not loose.
- Check machine for any loose fixings, and fraying wires.
- Depending on use (ours usually lasts three to six months, printing eighteen hours a day, six days a week…), replace the Kapton tape on the bed.
If you move your printer
- Check frame for nuts and bolts that may have been loosened in transit.
- Check frame alignment and bed level – the printer’s alignment can be effected by the surface it stands on.
- Check wiring is all in place and connected before applying power.
RepRapPro Firmware
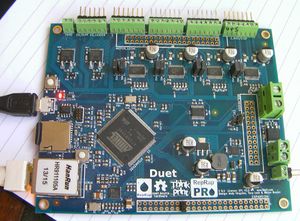
RepRap Firmware was written to allow RepRap machines (and other 3D printers) to be driven by more powerful controllers, such as the Arduino Due-compatible RepRap Duet (illustrated above). It permits the RepRap machine to be controlled either using a traditional USB connection with software such as Pronterface, or over a network. To control the RepRap machine over a network all that is needed is a web browser. These instructions describe how to use the RepRap Firmware on the Duet.
RepRap Firmware is available on Github here. Select the master branch, then use the Download Zip button (with the little cloud and arrow) on that page to download it. The master branch is the stable branch for the Duet. The test and dev branches are also for the duet, but are the development branches for that board. You can use the dev branch if you wish – it will be more up-to-date and have more features; but it may also contain new and interesting bugs.
Installation – Flashing the Firmware
Your Duet will have been supplied with a copy of the RepRap Firmware installed. But upgrades and enhancements will be made available regularly, and you will want to upload or flash these to your Duet.
Check your firmware version
Connect to your Duet board via the Arduino IDE Serial Monitor, or Pronterface, and send the ‘M115’ gcode. The response should be something like:
FIRMWARE_NAME:RepRapFirmware FIRMWARE_VERSION:0.78 ELECTRONICS:Duet (+ Extension) DATE:2014-06-11
Compare the firmware version information from the M115 command above, with the file name of the file in this link, which is on our github page. But DO NOT DOWNLOAD THIS FILE DIRECTLY! This file is the latest binary image of the RepRap Firmware for the Duet. The name of the firmware reflects the version number, eg RepRapFirmware-XXX-DD-MM-YYYY.bin, where XXX is the version, and DD-MM-YYYY is the date of the firmware.
If your firmware version is the same as the github version, there is no need to update. If not, read on…
Download the latest firmware
Download the WHOLE firmware folder from Github; click Download ZIP, on the right hand side of THIS PAGE. Extract it to a sensible place on your computer.
In the RepRap Firmware folder, there is a folder called Release, which contains the firmware ‘.bin’ (for binary) file. This is the file you will need to upload to the Duet. The name of the firmware reflects the version number, eg RepRapFirmware-XXX-DD-MM-YYYY.bin, where XXX is the version, and DD-MM-YYYY is the date of the firmware.
Required Software
You will need a copy of the Arduino IDE for the Arduino Due microcontroller. This comes bundled with an application called ‘bossac‘, which is used to upload (or ‘flash’) firmware to the Duet.
From the link, download and install the version appropriate to your operating system. Once installed, bossac should be in the Arduino application folder. It’s location will depend on your operating system:
On Windows, the Arduino IDE is usually installed in C:\Program Files (x86)\Arduino-1.6.1\ (or something similar). The bossac.exe program (this may just show as ‘bossac’ – Windows is set as standard to hide the file extension) will be in C:\Program Files (x86)\Arduino-1.6.1\hardware\tools
On Linux, you might install the Arduino IDE in /usr/local/arduino-1.6.1/. The bossac program will then be in /usr/local/arduino-1.6.1/hardware/tools/
On Apple OS X, bossac is part of the Arduino application package; install the Arduino application in your Applications folder. You can open the software package; bossac will be in Arduino.app/Contents/Resources/Java/hardware/tools/
Updating the firmware
Windows
| Check that the Duet has been recognised by Windows, by looking in the Device Manager (how to). The Duet should be listed in the ‘Ports (COM & LPT)’ list, as an ‘Arduino Due’ (if the firmware has NOT been erased; see the above step), or ‘bossac programming device’ (if the firmware has been erased). It should have been assigned a COM port, eg COM4. | 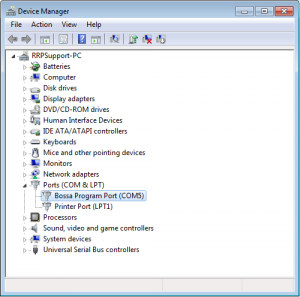 |
|
| It will be easier if you copy ‘bossac.exe’ (from the Arduino\hardware\tools folder) and the RepRapFirmware-XXX-DD-MM-YYYY.bin file to a simple C:\Temp folder. | 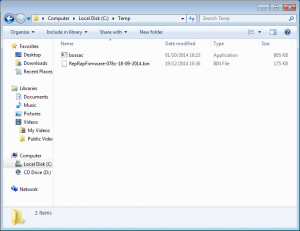 |
|
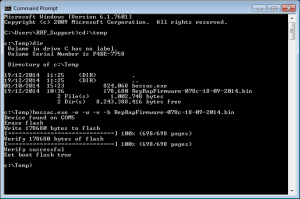
Open a Command prompt (How to), then type (without quotes) ‘cd C:\Temp’ and press return to change directory (or change directory to wherever you put bossac and the firmware). Type ‘dir’ and press return to get a directory listing; you should see bossac.exe and the firmware file. Type the following (change XXX-DD-MM-YYYY to match the firmware name you want to upload):
bossac.exe -e -w -v -b RepRapFirmware-XXX-DD-MM-YYYY.bin And press return to send the command. Bossac will auto-sense the port the Duet is connected to, report the upload/flash progress then tell you that it has verified the process. |
 |
|
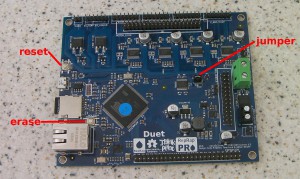
If it doesn’t work, check the error message. It may be you are running it from the wrong directory (eg ‘command not found’ or ‘no such file or directory’), or the firmware file name is wrong (‘no such file or directory’), or the command has been input incorrectly (‘bossac: invalid option’) or you haven’t waited quite long enough for the Duet to stabilise after pressing ‘erase’ and ‘reset’ (‘Auto scan for device failed’). Also, press ‘erase’ and ‘reset’ on the Duet again, and wait a little longer.
Mac
Check that your Duet has been recognised by your Mac. Open the Arduino IDE, and see that it is in the list of ports; it will be something like cu.usbmodemfa131. You can get this by sending ‘ls /dev/cu.*’ in a Terminal window for a list of ports.
Open a Terminal window (how to), cd (change directory) to the folder where you have put RepRapFirmware-XXX-DD-MM-YYYY.bin. Assuming the Arduino application is in the Applications folder, type the following (change XXX-DD-MM-YYYY to match the firmware name you want to upload):
/Applications/Arduino.app/Contents/Resources/Java/hardware/tools/bossac -e -w -v -b RepRapFirmware-XXX-DD-MM-YYYY.bin
Send the command. You should see bossac report the upload/flash progress then tell you that it has verified the process.
If it doesn’t work, check the error message. It may be you are running it from the wrong directory (eg ‘command not found’ or ‘no such file or directory’), or the firmware file name is wrong (‘no such file or directory’), or the command has been input incorrectly (‘bossac: invalid option’) or you haven’t waited quite long enough for the Duet to stabilise after pressing ‘erase’ and ‘reset’ (‘Auto scan for device failed’). Also, press ‘erase’ and ‘reset’ on the Duet again, and wait a little longer.
Linux
Check that your Duet has been recognised by Linux. Open the Arduino IDE, and see that it is in the list of ports; it will be something like /dev/ttyACM0. Open a terminal windows (xterm, gnome-terminal etc.) and cd (change directory) to the folder where you put RepRapFirmware-XXX-DD-MM-YYYY.bin. Assuming arduino is installed in /usr/local/ type the following (change XXX-DD-MM-YYYY to match the firmware name you want to upload):
/usr/local/arduino-1.5.7/hardware/tools/bossac -e -w -v -b RepRapFirmware-XXX-DD-MM-YYYY.bin
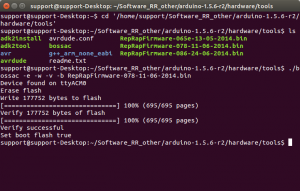
Send the command. You should see bossac report the upload/flash progress then tell you that it has verified the process:
If it doesn’t work, check the error message. It may be you are running it from the wrong directory (eg ‘command not found’ or ‘no such file or directory’), or the firmware file name is wrong (‘no such file or directory’), or the command has been input incorrectly (‘bossac: invalid option’) or you haven’t waited quite long enough for the Duet to stabilise after pressing ‘erase’ and ‘reset’ (‘Auto scan for device failed’). Also, press ‘erase’ and ‘reset’ on the Duet again, and wait a little longer.
IMPORTANT: Update the SD Card files!
Finally, you need to keep the files on the SD card ON THE SAME VERSION as the firmware you just updated to. Copy the contents of the SD-Image-[printer-version] folder from firmware folder (the .zip file you downloaded) to the root of your SD Card, where [printer-version] is your printer and version (eg Ormerod 1 or Ormerod 2), as you did in the Commissioning instructions. If you have created a custom config.g file on your SD Card, copy them off the card first. Then copy the standard new config.g file to keep a backup, and edit it to reflect your custom settings for things such as bed probe points.
SD Files
The Duet needs to store RepRap Firmware configuration files on an micro SD card. It needs those files to be present all the time that the firmware is running, so don’t unplug the SD card while power is applied, either from the RepRap’s main power supply, or just from the USB.
Your Duet should have been supplied with a micro SD card. You will need to copy the configuration files to this. You will also need to set your network addresses in the configuration files, if you plan to access the printer via the ethernet port.
Take the SD card, put it in a computer adapter, and plug it into your computer.
Download the RepRap Firmware files from the Git repository here. Use the Download Zip button (with the little cloud and arrow) on that page to download all the files.
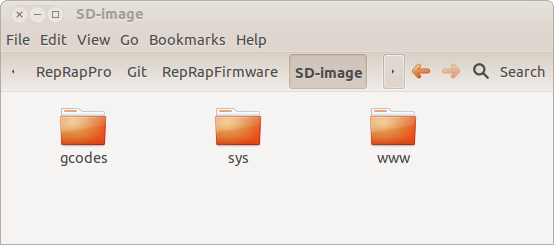
There is a folder in the Github repository you downloaded called SD-Image-[printer-version]. It has three sub-folders:
You can put any GCode files you want to print in the gcodes folder. For the moment file names are restricted to 8.3 format. This restriction will be removed in a future upgrade.
Remove any old versions of these folders from the SD card, then copy the gcodes, sys, and www folders onto it.
In the sys folder on the SD card there is a file called config.g. This special G Code file is run whenever the RepRap Firmware is restarted. It is described in detail below. For the moment you just need to set appropriate values in it for your network. Open a text editor (such as gedit or Notepad) and read in the file config.g. Near the top are four lines like this:
M540 P0xBE:0xEF:0xDE:0xAD:0xFE:0xED ; Set the MAC address
M552 P192.168.1.14; Set the IP address
M553 P255.255.255.0; Set netmask
M554 P192.168.1.1; Set the gateway
Unless you run multiple Duets on one network you should not need to change the MAC address. On the following lines change the numbers after the capital letter “P” to the values for your network. If you don’t know these, your network administrator will be able to tell you. Save the edited file.
Unmount or eject the SD card and its adapter from your computer. If it asks you if you want to erase any deleted files, say yes.
Put the SD card in your Duet’s SD card slot. It has a bistable click action – push it in and it will click in. To get it out, push it again and it will spring out. A short length of RepRap 1.75mm diameter filament makes a good tool to push with.
The configuration file
As has already been mentioned, RepRap Firmware can run a configuration file when it starts to set it and your RepRap up in the way you want. This is the file config.g in the sys folder on the SD card. This is an ordinary file of G Codes, but it is saved in a separate folder so that it can’t be deleted by accident.
The contents of config.g will look something like this:
; Configuration file for RepRap Ormerod 2
; RepRapPro Ltd
;
M111 S0                             ; Debug off
M550 PMy RepRapPro Ormerod 2        ; Machine name (can be anything you like)
M551 Preprap                        ; Machine password (currently not used)
M540 P0xBE:0xEF:0xDE:0xAD:0xFE:0xED ; MAC Address
M552 P192.168.1.14                  ; IP address
M553 P255.255.255.0                 ; Netmask
M554 P192.168.1.1                   ; Gateway
M555 P2                             ; Set output to look like Marlin
G21                                 ; Work in millimetres
G90                                 ; Send absolute coordinates...
M83                                 ; ...but relative extruder moves
M906 X800 Y1000 Z800 E800           ; Set motor currents (mA)
M563 P1 D0 H1                       ; Define tool 1
G10 P1 S0 R0                        ; Set tool 1 operating and standby temperatures
M92 E420                            ; Set extruder steps per mm
M558 P2                             ; Use a modulated Z probe
G31 Z2.5 P370                       ; Set the probe height and threshold
M557 P0 X60 Y0                      ; Four...
M557 P1 X60 Y165                    ; ...probe points...
M557 P2 X222 Y165                   ; ...for bed...
M557 P3 X222 Y0                     ; ...levelling
M556 S78 X0 Y0 Z0                   ; Put your axis compensation here
M201 X800 Y800 Z15 E1000            ; Accelerations (mm/s^2)
M203 X15000 Y15000 Z100 E3600       ; Maximum speeds (mm/min)
M566 X600 Y600 Z30 E20              ; Minimum speeds mm/minute
Anything including and after a “;” is a comment and will be ignored. As you can see you can give your machine any name you like, and any password. There is a complete list of all the RepRap G, M and T codes on the RepRap website here. RepRap Firmware does not (nor does it need to) implement them all, but if you send it one that is not implemented it will output a short error message on its USB connection, which you can see in the Pronterface monitor window.
You can edit config.g with an ordinary text editor (gedit, Notepad etc.), then upload it using Pronterface as described below.
Generally speaking, it is a bad idea to put anything in config.g that will cause the RepRap machine to move, or its heaters to heat up. This is because it will do this every time it is switched on or rebooted.. Moving and heating G Codes are much better put at the head of individual G Code files for printing things, as described here.
Other sys files
RepRapFirmware allows subprograms or macros to be programmed and placed in the sys folder. There are standard ones in there for doing things like homing the axes, but you can write your own too. Simply place a GCode file in the sys folder called, say, mymacro.g. You can then run it from Pronterface or the web interface or from within a GCode file by giving the command:
M98 Pmymacro.g
Here is the macro that homes the X axis as an example, with comments:
G91 ; set movements relative
G1 Z5 F200 ; move upwards 5mm at 200 mm/min to make sure we don't hit anything
G90 ; set movements absolute
G1 X-240 F2000 S1 ; Move X a long way negative while checking the endstop
G92 X0 ; The endstop will have been hit.  Set the X coordinate to 0
G1 X3 F200 ; Move a little away from the endstop more slowly
G1 X-30 S1 ; Approach the endstop more slowly to get a more accurate 0
G92 X0 ; Set the X coordiante to 0
G91 ; set movements relative
G1 Z-5 F200 ; Go down 5mm to reset the upward movement at the beginning
Using Pronterface to Control your RepRap Firmware
One of the strengths of RepRap Firmware is that it has the ability to emulate other existing RepRap Firmware in the way that it outputs information to its USB interface. This makes it possible to use it with a variety of software intended for that other firmware. We often use Pronterface to talk to a Duet running RepRap Firmware.
Download our version of Pronterface and its associated software from github here. See the README.md file on that page for installation notes.
To use Pronterface you first need to set the Firmware output to emulate RepRap Marlin firmware – the firmware that Pronterface expects to talk to. This can be achieved by including the line
M555 P2
in the file config.g in the sys folder on the Duet’s SD card. See the section on config.g above. This line may already be in the file; lots of distributions include it.
Connect the Duet to your computer with its USB cable, and also – if you can – connect the Duet’s ethernet cable. When the RepRap Firmware reboots it tries several times to establish a network connection. If it can’t find one, this can delay the boot process (sometimes by up to a minute). So if you plug in an ethernet cable (even if you don’t intend to use it) this will speed things up.
Run Pronterface.
Select the USB port that your computer has allocated the Duet in Pronterface’s Port box, select a communication speed of 115200, and click the Connect button.
You should now be able to control your RepRap/Duet from Pronterface in the usual way. This includes uploading files to the SD card for printing. If you do this, these files will also be available when you use the web interface described below.
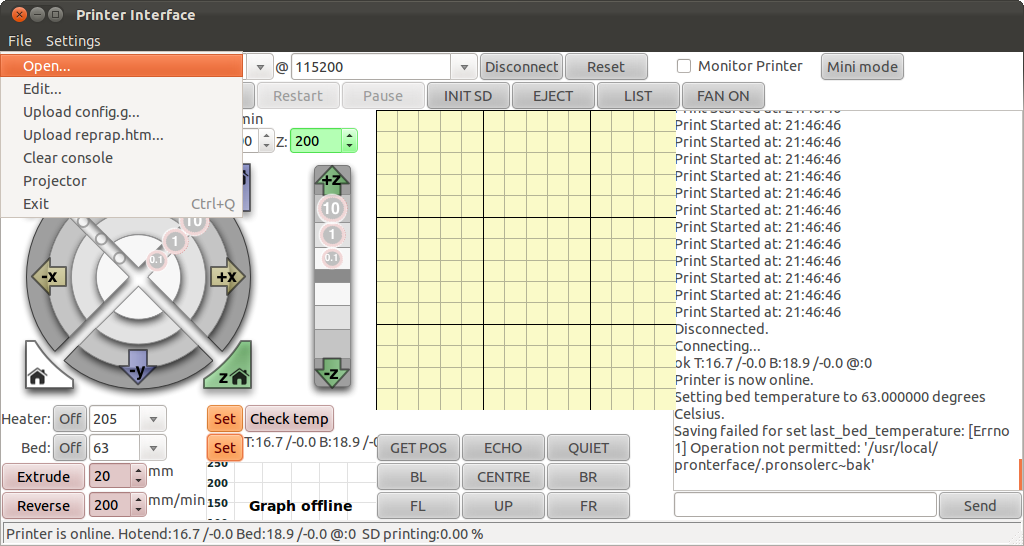
Finally, there are two special additions to our distribution of Pronterface just for RepRap Firmware. You can see them in the File dropdown menu in the picture above. Upload config.g… allows you to upload a new version of the config.g file (see below) to your Duet without unplugging then plugging in the SD card. Upload reprap.htm… allows you to upload a new version of the web page that the RepRap firmware serves to the web interface described below. So – if you want to personalize the appearance of the web interface, go ahead. If you make a mess, you can always recover the original from the Github repository download.
Changes to these files will not come into operation until you next restart your Duet.
Using a Web Browser to Control your RepRap Firmware
We are now using Matt Burney’s brilliant web interface for Ormerod/Duet, so many thanks to him. We keep our own fork of his repository here.
At the moment the RepRap Firmware is configured to use the Google Chrome and Firefox browsers, which are available to download from that link. Other browsers may well work, and will be supported soon.
Details of how to set up the IP addresses and other ethernet aspects of your Duet are described on the the Commissioning Page here.
Plug an RJ45 network cable into the socket on your Duet and plug the other end into your network hub or router.
Turn on the power to your RepRap. The green LED on the Duet’s network socket should come on, go out briefly, and then come on again, and may flicker. The orange LED may come on, or not, depending on the router it is attached to. Don’t worry about it if it doesn’t come on.
Give it a few moments to settle down.
Open the browser on your computer, and type the IP address of the Duet into its address bar. The following page will be displayed:

The machine’s IP address should be displayed after the “RepRapPro Ormerod” top left. If you have multiple Ormerod 2s on your network make sure you are talking to the right one. You can control them all from the same browser window – just open a tab for each.
Click on “Connect” and the page will change to:
Most of the boxes and buttons are self-explanatory, but for completeness they are described here.
Top left is the IP address of the Duet, as mentioned above. To the right of that is a drop box into which you can drag and drop a G Code file out of Slic3r to print it immediately. To the right of that is a box into which you can type any Duet RepRap G Code. For a complete list see here, though the Duet does not support (because it does not need to) every G Code listed on that page. Some of the more common and useful G Codes are available from the drop-down menu under the arrow.
Moving on down, there is the green Online display that toggles with the connect button to (dis)connect the web interface (from)to your RepRap.
The red STOP! button will stop a running print instantly (Well. At the speed of a 100 Mb/s ethernet, which is rather faster than mere human reaction times). STOP! will disable all the motors and heaters, which will not then work again until the Duet’s reset button has been pressed, or the Duet has been switched off and on again.
The Pause button will pause a running print, which you can then choose to resume. This is not instantaneous, as the Duet has to exhaust its internal buffer of queued-up moves (usually twenty or so) before it pauses. Pause is useful, for example, if your filament is running out and you want to load new filament in the middle of a print. Try to click the Pause button at the start of the infilling of a layer. That way the machine should stop with the head over what will be the insides of your printed object and so won’t leave a mark on the surface where it waits stationary.
To the right of those buttons is temperature control and display. You can type a temperature for the head or the bed in the box and set it, or choose from the drop-down menu of popular values. The graph plots the temperatures as they change with time.
At the right is the position of the three machine axes, the length of material that has been extruded, and the value being returned by the Z probe (bigger is closer). Note that, if the machine is in its default mode of receiving relative extrusion lengths at each move, the extrude value will simply either be zero or one of those small lengths.
Below this is the control for the movement of the machine. You can home all the axes at once, or home each one individually. The rectangle of X, Y and Z boxes moves each axis positively or negatively by the specified number of millimetres.
At the right is the control for the extruder. You can select a feed rate, whether to go forwards or backwards, and the length of filament to extrude. Remember not to extrude filament when the head is cold, as it will jam.
Finally, at the bottom, there is a button to turn all the motors off (useful if you want to move the machine by hand) and a selection of common G codes that you can just click on to send. There is no need to turn the motors on again after you turn them off. Moving a motor automatically turns it on first.
If you click on the Print Status tab you will get this page displayed:
This gives you layer and height information about a running print, and estimates of how long things will take.
If you click on the Gcode Files tab you will get:
Though the list of G Code files may be different.
This lists the G Code files on the Duet’s SD card that are available to print.
To run one, simply click on it.
To delete a file, hover over the rubbish bin symbol to its right and the file’s box will go red. Click and the file will be deleted.
If you drag and drop a G Code file from your computer’s desktop to the SD Upload Drop box it will be uploaded to your SD card ready to print. If you want to upload a file with the same name as one that is already there, you must delete the old one first.
Click on the Message Log tab. You will get:
This tells you such things as the version of the firmware that you are running and allows you to set the refresh frequency of the web display.

