Contents
Printing the Orthogonal Axis Compensation Test Pieces
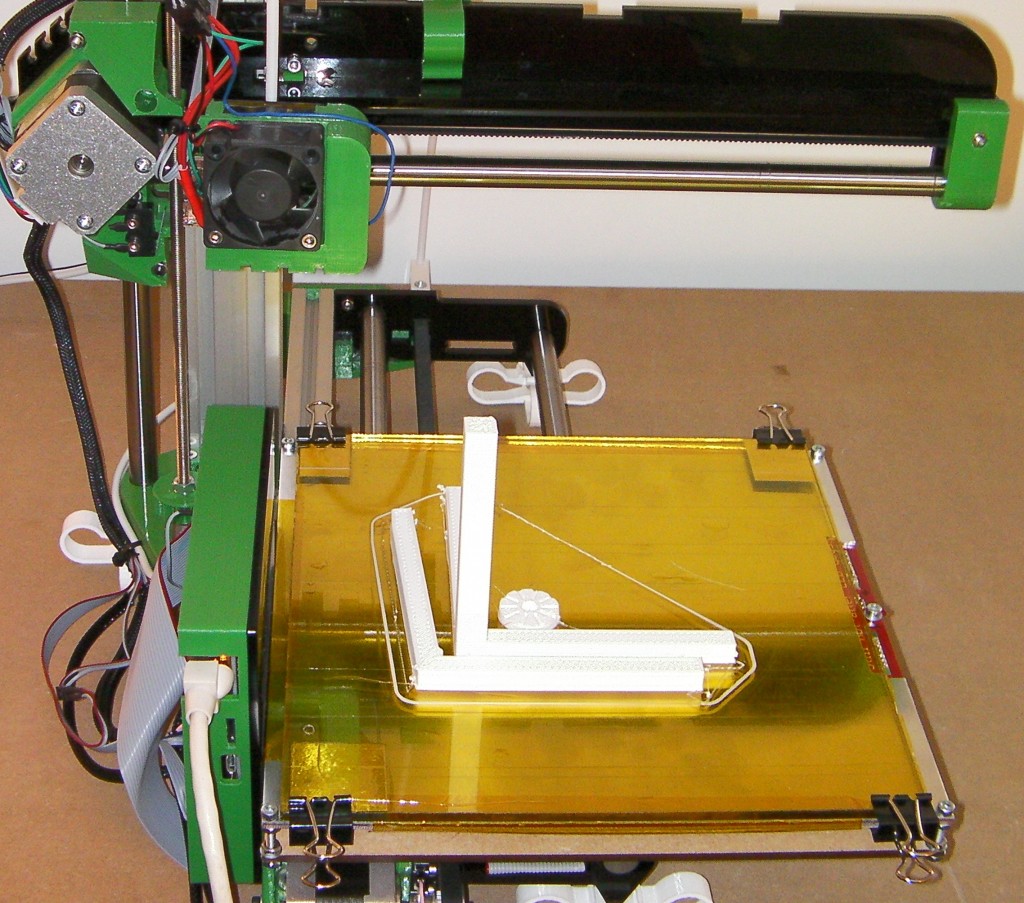
The first thing to print is the orthogonal axis compensation test pieces, as in the picture above. The G Codes for this are in a file called ORMAXIS.G on the SD card.
(The 3D models for the test pieces are in the Data folder of the RepRap Firmware download, incidentally: gauge.stl, thumbwheel.stl, testpiece.stl, and calibration.scad.)
For help on the Ormerod user interface, see here.
Plug in the USB and power, power on your Ormerod, wait a short time for it to connect to the network, open the browser, and type the IP address of the Ormerod in the address bar.
Connect. You should be on the Control page.
Home the axes, and, if you are using automatic bed levelling, send a G32 command to set the bed plane equation.
Check that all the numbers for position and temperature look as you would expect.
Now run the ORMAXIS.G file. It should print the objects above. Before you take them off the bed, use a felt-tipped pen to label the axes of the three-legged piece. In the picture above, X runs left-right, Y runs front-back, and Z runs down-up.
You can now go back to the Calibration instructions and set the orthogonal axis compensation.
The G Code files for printing a snowman Christmas tree decoration and the traditional RepRap coathook are also on the SD card. You can print those in just the same way as above.
Converting CAD files for printing
File formats
Most CAD software can output files that can be used for 3D printing. There’s a useful list of free CAD systems here on the RepRap website. Professional software like SolidWorks and Autocad, as well as free options such as RS DesignSpark Mechanical, Sketchup, Blender, and OpenSCAD (as well as many others) can export stereolithographic (STL) files. They use the file extension ‘.stl’.
An STL file is a list of triangles completely covering every surface of a 3D object. This is not a very robust way of representing a solid, but it has become a universal standard.
Slicing software
Like most 3D printers, Ormerod 2 is actually controlled by G Codes – low-level instructions that say things like go-to-this-point, or print-filament-in-a-line-from-this-point-to-that. We need a program to convert STL files into G Codes. A very good program to do that is called Slic3r. It is open-source and free, and available here. There is also documentation on Slic3r available here, so that is not reproduced here.
Slic3r profiles
Slic3r needs to be set up for each type of 3D printer for which it translates STL files into G Codes. We have performed that set-up for you for our printers, and have created profiles that you can install.
Our profiles are stored as ‘config bundles’. These config bundles are to be used with Slic3r 1.1.7 (and later). Get the latest version of Slic3r and follow the installation instructions. You can replace the version of Slic3r supplied with our ‘software’ installation, with your downloaded version.
Then, download our config bundles (for all the printers we supply) by clicking HERE. This is a direct link to the profiles ZIP file. You can also get it (or individual config bundles), by visiting our profiles github repository. If you download an individual .ini file, make sure you download the RAW version! Or the file will not import into Slic3r.
To install the config bundle, first decompress the profiles-master.ZIP file you downloaded. Open Slic3r. If the ‘Configuration Wizard’ appears, cancel this. Click ‘File > load config bundle’ and choose the [printer].ini file, from the profiles folder you unzipped, appropriate to your machine.
Now, in Slic3r, there will be drop-down options for Print settings, Filament and Printer.
For ‘Print settings’, select your nozzle size, eg ‘0.5mm Nozzle’ for printer with a 0.5mm nozzle, which is our standard size.
For ‘Filament’, select your filament type. Profiles are supplied for PLA and ABS. If you’re printing with ABS, see our Printing ABS guide.
For ‘Printer’, select you printer setup, eg ‘Ormerod PLA 0.5mm Single Nozzle‘. If you have multiple nozzles, see the Multi-materials Printing instructions.
These settings should get you going, and produce good G code for your printer. For more information on changing the Slic3r settings, see the Slic3r manual.
Printing from the SD card
You may have noticed that, so far, all printing is done from the SD card. This is the preferred way of printing. It is possible to print directly from Pronterface (i.e. to load gcode files into Pronterface and press print), but the serial communication is slow. The printer will pause a lot during printing, and the printed part will not be of good quality, and so this is not recommended.
There are three ways to transfer files to the printer:
- In Pronterface, load the gcode file you want to print. It will appear in the centre window. DO NOT press ‘Print’! Click the ‘SD’ button, and click ‘SD upload’. You can then upload the gcode file to the SD card while it is still in the Duet. This is quite slow, and is suitable for small files only (1MB will take a couple of minutes).
- You can also upload files through the web interface under the Gcode Files tab. This is a simple drag-and-drop operation.
- Finally, you can turn off the printer, remove the SD card from the Duet, insert it into the USB adapter, then into your computer. Copy the gcode file from your PC to the SD card. Always copy gcode to the gcodes folder of your SD card to print. This is where the firmware looks for files. Then eject the USB adapter. Wait for it to finish writing, then remove the SD card. Reinsert it into the Duet. Restart the printer. Your gcode file should be accessible from the Pronterface ‘SD’ menu and from the web interface.
Future firmware updates will improve the speed of serial communications, and give more options for uploading files to the SD card.
Print an Ormerod
Ormerod 2 is a RepRap – a Replicating Rapid Prototyper. So, to experiment, why not print out some of Ormerod 2’s own parts? These are available in the folder stl/individual parts in the Ormerod download. When Slic3r has generated a G Code file for you from an STL file, you can put it in the gcodes folder of Ormerod 2’s SD card and then print it. Either put the SD card in your computer to copy the file (remember not to take it out of Ormerod unless all power including the USB is off), or you can upload G Code files using Pronterface or the web interface. The Duet controller in Ormerod 2 expects file names to be in 8.3 format at the moment. This restriction will be removed on a future release.
And, now you have started, why not print out a full set of Ormerod 2 parts for a friend? Hardware-only kits for Ormerod are available, giving all the things you will need other than the printed parts to build another complete Ormerod 2.
Happy 3D printing!


